Skip to content
OneSuite Logo
  • ProductExpand
    • Project Management

      Time Tracking

      Track hours and boost productivity

      Projects & Tasks

      Manage tasks smartly and deliver on time

      Team & Collaborators

      Work together and stay aligned

      Reporting

      See where your agency stands

      Finance Management

      Invoicing

      Create invoices in minutes and get paid

      Subscriptions

      Bill clients on repeat automatically

      Expense Tracking

      Track costs and bill them back

      Budgeting

      Plan budgets and protect margins

      Client Management

      Client Portal

      Ensure transparency and gain trust

      Documents & E-Signature

      Create and sign documents easily

      CRM

      Nurture leads and win more clients

      Email Inbox

      Manage client emails in one place

  • Use CasesExpand
    • Marketing Agency

      Campaigns, clients, and billing together

      Local SEO

      Multi-location clients, billing on track

      Creative Agency

      Briefs, feedback, and billing unified

      SEO Agency

      Projects, reports, and invoices in one

      Photography

      Booking to delivery in one place

      Consulting

      Proposals, tracking, and invoicing together

      Video Editing

      Approvals, revisions, and payments simplified

      Event Management

      Timelines, vendors, and clients covered

      IT Services

      Tickets, retainers, and portals managed

  • ResourcesExpand
    • Documentation

      Read guides and help docs

      Roadmap

      See what’s coming next

      Compare

      See how OneSuite stacks up

      Affiliate

      Partner and earn together

      Changelog

      Stay updated with the latest

      Case Study

      Real results, real teams

      Integrations

      Connect tools effortlessly

      Support

      Get help whenever you need it

      FAQ

      Find answers to common questions

  • Pricing
  • For Agency

Start free trial

Help Center

  • Documentation
  • Public Roadmap
  • Book a demo
  • Get Support
OneSuite Logo
intro to onesuite

OneSuite 101

6
  • Introduction to OneSuite
  • Understanding OneSuite’s Structure
  • How Solutions Work Together
  • Navigating OneSuite
  • All OneSuite Capabilities
  • OneSuite Glossary
quick start guide

Quick Start Guide

9
  • Sending Your First Invoice
  • Tracking Your First Hours
  • Setting Up Your Business
  • Adding Your Payment Methods
  • Inviting Team Members
  • Adding Your First Leads
  • Adding Your First Client
  • Giving Your Client Portal Access
  • Sending Your First Proposal

CRM

9
  • Opportunity Automation
  • Customizing Your CRM
  • Customizing Your Opportunities View
  • CRM Overview
  • Adding People
  • Adding Companies
  • Creating Opportunity
  • How Opportunities, Companies, and People Work Together
  • Understanding Pipeline Stages
client

Client Management

6
  • Adding Clients
  • Client Profiles
  • Client Portal Customization 
  • Understanding the Clients Solution
  • The OneSuite Client Portal
  • Video Documentation : Client Management
pm

OneSuite Project Management

12
  • How to Track Project Hours and Costs
  • How to Set Up Project Billing and Budgets
  • Laying the Groundwork: Project Creation in OneSuite
  • Customize the Project Management Module
  • Managing Project Boards in OneSuite
  • Subtask Behavior & Movement Management
  • Custom Categories, Tags, and Labels in Projects
  • Adding Tasks to Boards in OneSuite
  • Custom Fields
  • Task Templates
  • Project Templates
  • Video Documentation : Project Management

Documents

5
  • Overview
  • Creating a Document from Scratch
  • Uploading a PDF Document
  • Sending Documents to Parties to Sign
  • Signing a Document
team

OneSuite's Team Management

4
  • Inviting Collaborators in OneSuite
  • Creating Personalized Departments in OneSuite
  • Managing Team Members in OneSuite
  • Video Documentation : Team Collaboration
Invoices & Payments

Invoices & Payments

9
  • How to Use Retainers
  • How to Record Invoice Payments
  • Access & Navigation
  • Invoice Settings & Customization
  • Create One-time Invoices
  • Creating Recurring Invoices
  • How to set taxes on your invoices
  • How to Add Direct Bank Transfer Instructions to Your Invoices
  • How to Customize Invoice Email Messages

Time Tracking & Timesheets

6
  • Timesheet Preferences
  • Work Types
  • Time Tracking in OneSuite
  • Invoice Generation from Billable Hours
  • Timesheet Management & Approval
  • Time Tracking & Timesheets 

Email Inbox

5
  • Email Inbox Overview
  • Connect Microsoft Outlook
  • Integrate Gmail in OneSuite 
  • Send and Receive Email in OneSuite 
  • Create and Use Email Templates in OneSuite

Calendar View

1
  • Calendar View

Dashboard

7
  • Overview 
  • How to Customize Your Dashboard
  • Client Portal Dashboard 
  • Monitor Documents, Contracts & Marketing Lead Sources
  • CRM, Client & Pipeline Widgets — OneSuite Dashboard Guide
  • Track Tasks, Deadlines & Project Activity in OneSuite
  • Track Revenue Trends, Forecasts & Top Projects in OneSuite

Expenses

2
  • Expense Categories
  • Tracking Expenses

Approvals

2
  • Approval Policy
  • Approving Timesheets and Expenses

Estimates

1
  • Estimates

Reports

2
  • Saving and Scheduling Reports
  • Reports Overview

Integrations

5
  • How to Use Webhooks and API Keys
  • How to Connect Analytics Tools
  • How to Connect Calendar, Files and Meeting Tools
  • How to Connect Accounting and Payment Tools
  • Integrations Overview

Settings & Billing

4
  • Imports, Exports, and Search
  • Managing Your OneSuite Subscription
  • Setting Up Profiles and Permissions
  • Setting Up Your Workspace
View Categories
  • Home
  • Docs
  • OneSuite's Team Management
  • Inviting Collaborators in OneSuite

Inviting Collaborators in OneSuite

0:00 / 8:35
  • View as Markdown Open this page as plain Markdown (opens in a new tab)
  • Open in ChatGPT Ask questions about this page (opens in a new tab)
  • Open in Claude Ask questions about this page (opens in a new tab)
  • Open in Google AI Studio Ask questions about this page (Google account required) (opens in a new tab)

Inviting a collaborator emails them a link to join your business in OneSuite, with their access, projects and reporting line already set. Setting these up in the invitation means the person can start tracking time and working on projects as soon as they accept.

In this guide you’ll learn how to:

  • Open the invite page from Team
  • Enter a new person’s details, capacity and rates
  • Choose a profile and adjust permissions for the invitation
  • Add the person to projects and assign the people who report to them
  • Handle a full plan when you invite someone

Before you start

  • You need permission to invite team members. Without it, the Invite button does not show on Team.
  • Rates and weekly capacity only appear in the form if you are allowed to set them. See the tables below.
  • Decide which profile the person should start on. Profiles decide what someone can see and do. See How to Set Up Profiles and Permissions.

How to open the invite page

You invite someone from the Invite button on the Members tab of Team.

  1. Click Team in the sidebar, under Company.
  2. On the Members tab, click Invite.

The Invite person page opens with a Back to Team link and the note “We’ll email this person a link to join your team. You can change what they can do afterwards.” The invitation takes four steps. It is sent at the end of step 2, and steps 3 and 4 are optional.

Step 1: Who are you inviting?

You enter the person’s email and, if you want, their employee details, roles, departments, capacity and rates. Only the email is required.

  1. Enter the Email.
  2. Fill in any optional fields from the table below.
  3. Click Continue.

When you click Continue, OneSuite checks the address before moving on. If there is a problem, you stay on step 1 and the message shows under Email:

Message What to do
Email is required Enter an email address.
Please enter a valid email Fix the address. It needs a name, an @ and a domain with a dot, such as name@example.com.
{email} is already a member of this team This person is already on your team. Find them on Members instead.
{email} has already been invited. Resend or cancel it from the Team list An invitation is already waiting. Resend or cancel it from the person’s row menu on Members.

Step 1 fields

Field Required Notes
Email Yes The address the invitation is sent to.
Employee ID No “A unique identifier for this person within your organisation.” Up to 64 characters.
Type Always set Employee (the default) or Contractor. Employees and contractors are grouped separately on the roster.
Roles No Labels such as Designer, Senior or QA. Pick existing roles or type a new one and click Create “…”. Roles grant no access.
Departments No Pick existing departments or create a new one the same way.
Weekly capacity No 0 to 60 hours per week, in half-hour steps, or Not set. Shown only if you can view team capacity.
Billable rate No Per hour. Shown only if you can edit team rates.
Cost rate No Per hour. Shown only if you can edit team rates and view cost rates.
Message (Optional) No A personal note for the invitation.

Weekly capacity starts on your business’s default, marked (default) in the list. The default comes from Default weekly capacity in Settings, Time Tracking, Preferences. If none is set, the picker starts at 35.

A rate must be a number of 0 or more. If you type something else, the field shows Enter a rate, Rate can’t be negative or Rate is too large, and Continue keeps you on step 1 until you fix it.
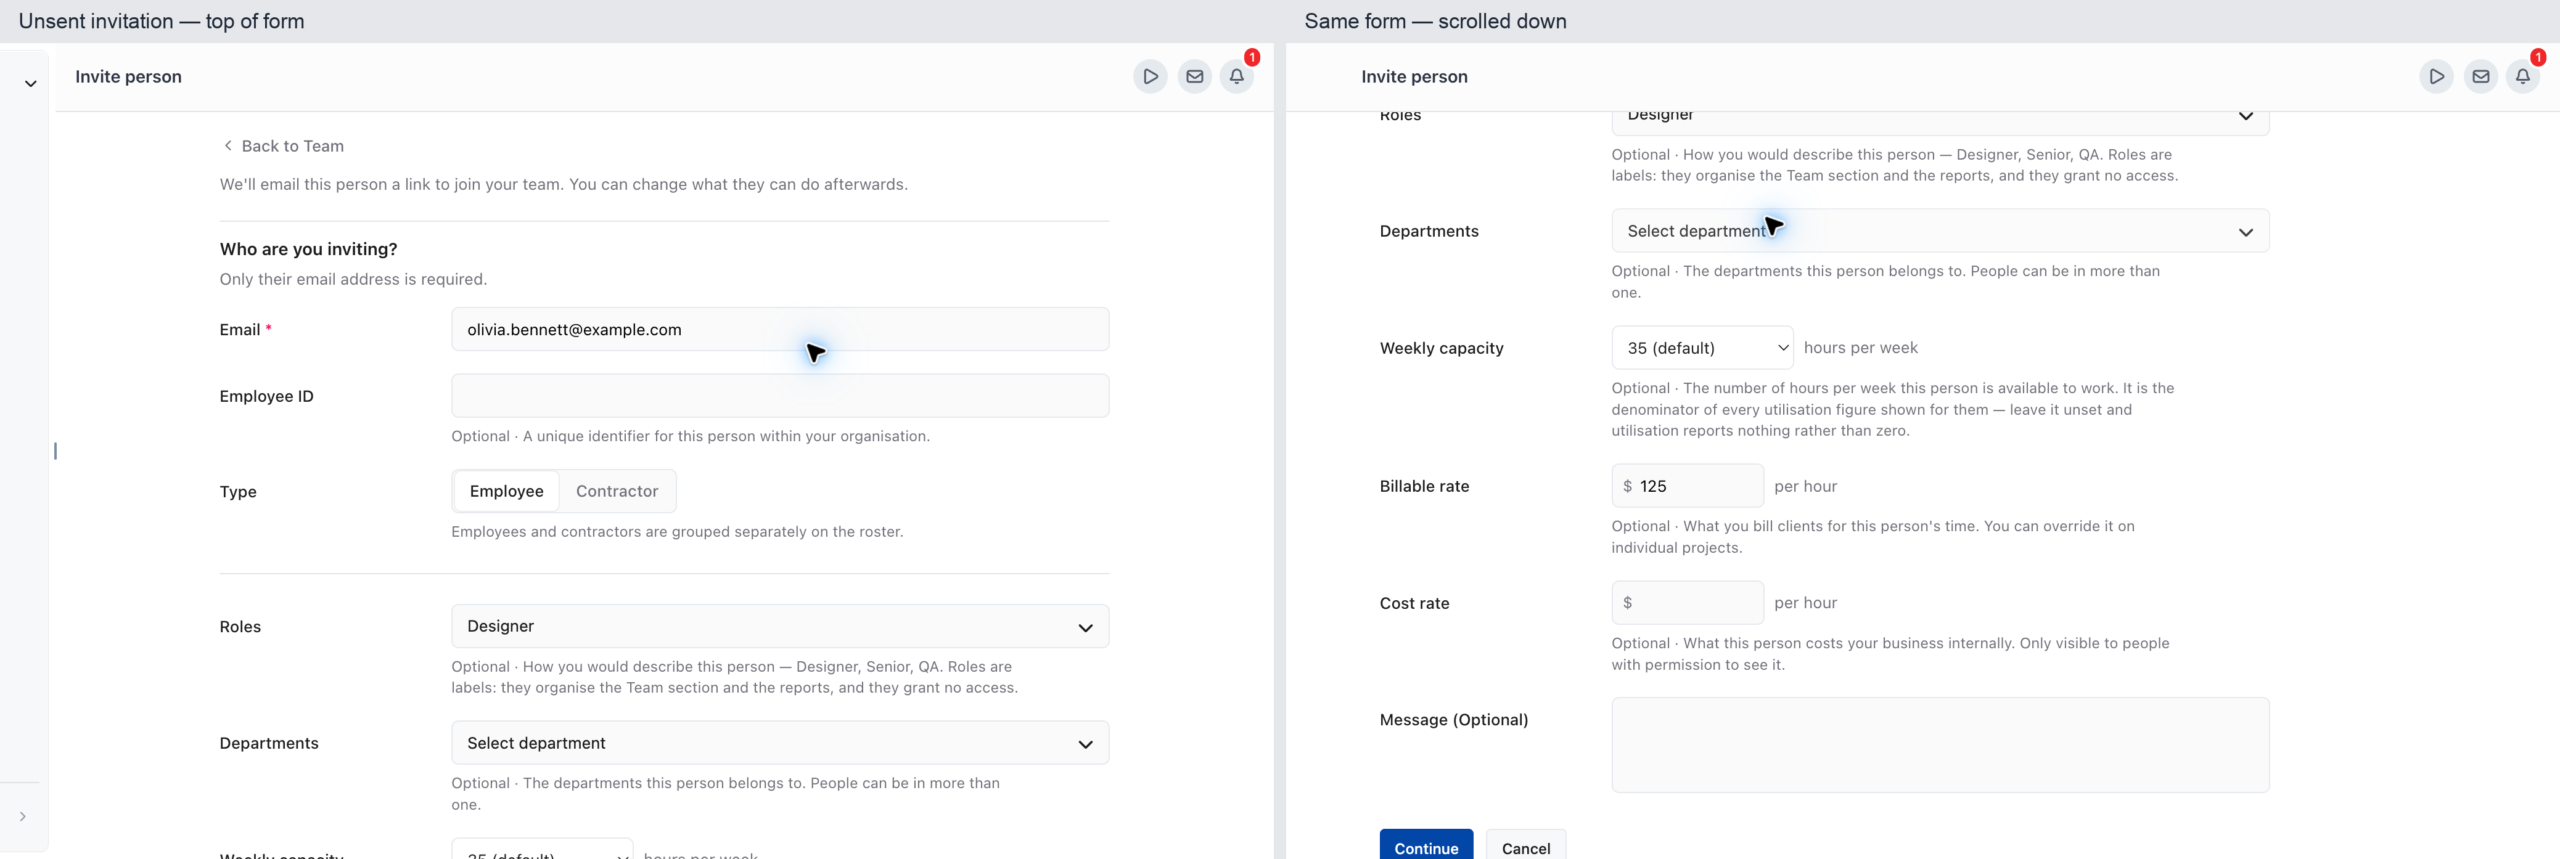
Invite person page on step 1, with Email, Type, Roles, Weekly capacity and Billable rate filled in

Step 2: What can they do?

You choose the profile the person starts on and, if needed, add extra permissions on top of it, then send the invitation.

  1. Under Profiles, select the profile closest to what the person needs. One profile is already selected when you arrive.
  2. Or select one of your business’s saved profiles under Custom Profiles. The person is invited on the profile you pick.
  3. Optional: use the permission list that opens under the selected profile to tick extra permissions. The profile then shows a badge such as +1 permission or +3 permissions.
  4. Click Send Invitation. Click Back to return to step 1 without losing what you typed.

The list of profiles and the permissions inside them are set up for your business, so they are not listed here. To create or edit profiles, see How to Set Up Profiles and Permissions.

Adjusting permissions for one invitation

  • Reset to {profile} defaults removes the extra permissions you ticked and returns to the profile as it is.
  • Save as custom profile turns the profile plus your extra permissions into a new profile. Enter a Custom profile name, such as “Marketing Lead”, and click Save custom profile. OneSuite selects the new profile for this invitation, and it appears under Custom Profiles for everyone you invite next.
  • Both links appear once you have ticked at least one extra permission.
  • Some of the selected profile’s permissions are locked and can’t be unticked here. You can fine-tune the person’s permissions after they accept, from their page on Team.

What happens if your plan has no free seat?

If your plan has no room for another member, OneSuite either stops the invitation or asks you to add a seat, depending on your plan.

  • Your plan has a member limit and you’ve reached it: OneSuite shows You have reached the maximum number of members invitations allowed in your current plan. and does not send the invitation.
  • Your plan charges per seat and every seat is used: the Add a seat? dialog opens. It says You’ve used all your seats., then shows what the extra seat costs now and on later bills. Click Add seat & invite to add the seat and send the invitation, or Cancel to go back to step 2 without sending.

After Cancel, you can change the profile or click Send Invitation again. For plan and seat details, see How to Manage Your OneSuite Subscription.

Step 3: What project are they working on?

You add the person to the projects they will work on, so they can track time on them as soon as they join.

  1. Search in Find and select projects to assign… and select each project.
  2. For each selected project, choose whether they manage it under Manages this project?. Use All or None to set every project at once.
  3. Click Assign projects. The button shows the count, such as Assign 3 projects.

To skip, click Skip. OneSuite asks Are you sure you want to skip? and warns that “Skipping this step means they will not be able to track time.” Click Assign projects now to stay, or Assign projects later to move on. You can add projects later from the person’s page on Team.

Step 4: Does anyone report to them?

You pick the people whose work this person oversees, which finishes the invitation.

  1. Search in Find and select people to assign… and select each person who reports to them.
  2. Click Assign people, or the count version such as Assign 2 people.

Click Skip if nobody reports to them. The note on this step explains that a profile on the managed tier sees the time, expenses and approvals of the people listed here, and of the projects the person leads.

When you finish, OneSuite shows {email} has been invited and opens the invitation’s edit page. There you can still change Basic info, Rates, Assigned projects and Permissions before the person accepts.

Not using OneSuite yet? Start your free trial →

FAQs

How do I invite a team member to OneSuite?

Click Team in the sidebar, then Invite on the Members tab. Enter their email, click Continue, choose a profile and click Send Invitation. Assigning projects and reports afterwards is optional.

Why can’t I continue past the first step of the invite?

The email is missing, not valid, already belongs to a member, or already has an invitation waiting. A rate below 0 or an Employee ID over 64 characters also keeps you on step 1. The message under the field tells you which.

How do I resend or cancel an invitation?

Open the person’s row menu on the Members tab of Team. For someone who hasn’t accepted yet, the menu offers Edit, Resend invitation and Cancel invitation.

Can I change someone’s permissions after I invite them?

Yes. The invitation’s edit page has a Permissions section, and once the person has joined you can change their profile and permissions from their page on Team. See Managing Team Members in OneSuite.

Can I import my whole team from a spreadsheet instead?

Yes. On the Team roster, open the menu and choose Import people to upload a CSV or Excel file matched on email. Use the invite page when you want to set up each person’s profile and projects one at a time.

What to do next

Look after your team: Edit people, capacity, rates and projects with Managing Team Members in OneSuite.

Shape access: Create the profiles you invite people on with How to Set Up Profiles and Permissions.

Group your people: Organize the team into departments with Creating Personalized Departments in OneSuite.

Updated on October 1, 2026

The complete client journey platform for agencies that scale.

2810 N Church St,
Delaware, USA, 19802

call +1 (302) 433-6002+1 (302) 433-6002
product hunt

Follow Us On

  • Facebook
  • X
  • Instagram
  • LinkedIn

Join Our Community

  • Facebook

Ask AI for a summary
of Onesuite

Features

Client portal

CRM & Lead pipeline

Project management

Documents & e-signature

Billing & invoice

Time tracking

Expense tracking

Budgeting

Reporting

API documentation

Resources

Documentation

Public roadmap

Become an affiliate

Agency partner program

About

Contact

Support

Blog

Branding

Book a demo

Compare

vs. Bonsai

vs. Assembly

vs. Dubsado

vs. Plutio

vs. Harvest

vs. HoneyBook

vs. Wayfront

Product demo

  • Terms of use
  • Privacy policy
  • Cookie policy
  • Refund policy
  • Acceptable use policy
  • Data processing terms
  • Product
    • Project Management

      Time Tracking

      Track hours and boost productivity

      Projects & Tasks

      Manage tasks smartly and deliver on time

      Team & Collaborators

      Work together and stay aligned

      Reporting

      See where your agency stands

      Finance Management

      Invoicing

      Create invoices in minutes and get paid

      Subscriptions

      Bill clients on repeat automatically

      Expense Tracking

      Track costs and bill them back

      Budgeting

      Plan budgets and protect margins

      Client Management

      Client Portal

      Ensure transparency and gain trust

      Documents & E-Signature

      Create and sign documents easily

      CRM

      Nurture leads and win more clients

      Email Inbox

      Manage client emails in one place

  • Use Cases
    • Marketing Agency

      Campaigns, clients, and billing together

      Local SEO

      Multi-location clients, billing on track

      Creative Agency

      Briefs, feedback, and billing unified

      SEO Agency

      Projects, reports, and invoices in one

      Photography

      Booking to delivery in one place

      Consulting

      Proposals, tracking, and invoicing together

      Video Editing

      Approvals, revisions, and payments simplified

      Event Management

      Timelines, vendors, and clients covered

      IT Services

      Tickets, retainers, and portals managed

  • Resources
    • Documentation

      Read guides and help docs

      Roadmap

      See what’s coming next

      Compare

      See how OneSuite stacks up

      Affiliate

      Partner and earn together

      Changelog

      Stay updated with the latest

      Case Study

      Real results, real teams

      Integrations

      Connect tools effortlessly

      Support

      Get help whenever you need it

      FAQ

      Find answers to common questions

  • Pricing
  • For Agency
  • Documentation
  • Public Roadmap
  • Book a demo
  • Get Support