
Email templates let you save pre-written emails that you can apply with one click when composing. Templates fill in both the subject line and the message body, so you can send consistent, professional emails without rewriting the same content. Each workspace supports up to 10 templates.
Before you start
- At least one connected email account (Outlook or Gmail)
- Templates are created in Settings → Email Templates and used in the compose window
How to create a new template
Click Settings in the bottom-left corner of the sidebar.
- Click Email Templates in the settings sidebar.
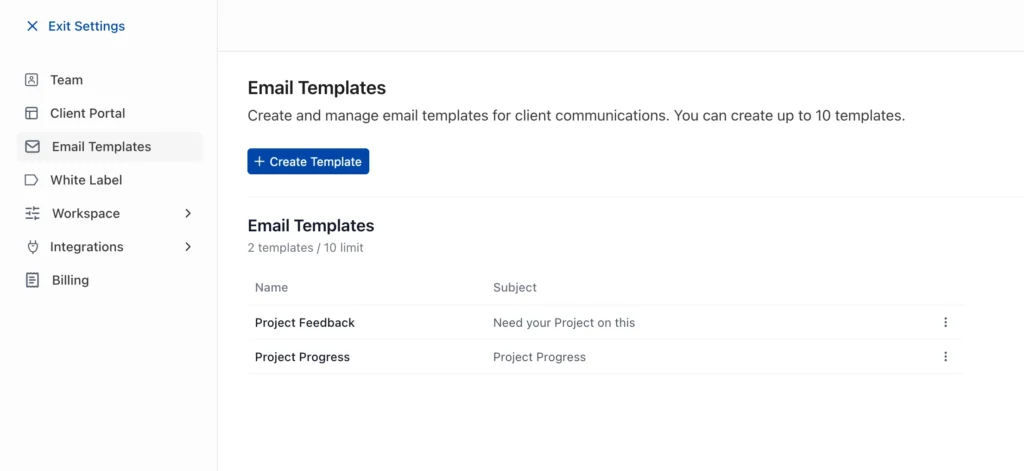
2. Click + Create Template.
3. The “Create Email Template” form appears with three fields:
- Name: Enter a name for your template (e.g., “Invoice Follow-up,” “Project Update,” “Payment Request”). This is the label that appears in the template dropdown when composing.
- Subject: Enter the email subject line that will auto-fill when the template is selected.
- Body: Write your template content in the rich text editor. You can format text with bold, italic, underline, strikethrough, alignment, bullet lists, numbered lists, links, and inline images.
4. *(Optional)* Click + Insert Field to add dynamic fields like {{first_name}} or {{business.name}} that auto-populate with record data when the email is sent.
Review the Deliverability Score at the bottom of the form. OneSuite scores your template out of 100 and flags potential issues that could affect email deliverability.
5. Click Save Template.
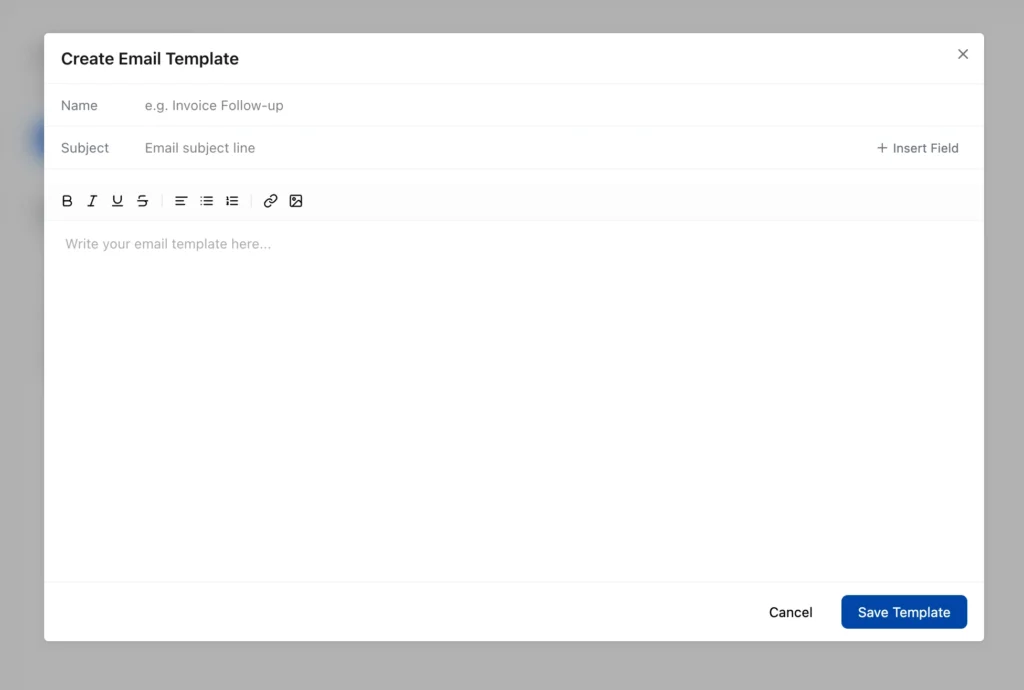
Note: The same rich text editor and + Insert Field button are available in the template editor as in the compose window.
Template limits
Each workspace supports up to 10 templates. The Email Templates settings page shows your current count (e.g., “7 templates / 10 limit”).
How to edit a template
- Go to Settings → Email Templates.
- Find the template you want to edit in the list.
- Click the three-dot menu (⋮) next to the template.
- Click Edit.
- Make your changes in the template form.
- Click Save Changes.
How to delete a template
- Go to Settings → Email Templates.
- Click the three-dot menu (⋮) next to the template.
- Click Delete.
- Confirm the deletion. Emails already sent using this template are not affected.
Available dynamic fields
You can use these variables in both the subject line and body of your templates. For the full reference table with all 12 fields, see Send and Receive Emails -> How to personalize emails with dynamic fields
Contact: {{first_name}}, {{last_name}}, {{full_name}}, {{email}}, {{phone}}, {{job_title}}, {{company_name}}
Business: {{business.name}}, {{business.email}}, {{business.phone}}, {{business.website}}
Owner: {{owner.name}}, {{owner.email}}
Other: {{current_date}}
Note: Dynamic fields only populate when the corresponding data exists on the record. If the [People](/docs/adding-people/) record doesn’t have a company name set, `{{company_name}}` will appear as literal text in the sent email.
How to use a template when composing
- Open the compose window from the Email module, a CRM record, or a Client record.
2. Click the Choose Template… dropdown (to the right of + Insert Field, above the message editor).
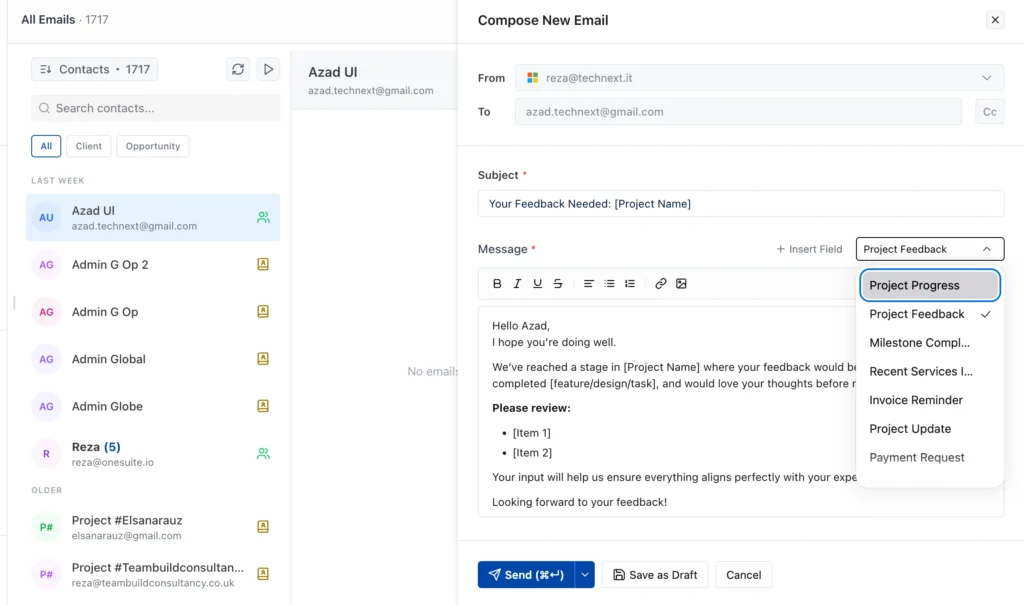
3. Select a template. The subject line and message body both populate automatically.
4. Review and edit as needed. Replace any placeholder text (like [Client Name] or [Project Name]) with actual details.
5. Click Send, Save as Draft, or use Schedule send as normal.
Tip: You can switch templates after selecting one. Choosing a different template replaces the current subject and body.
Example templates
The Email Templates list shows each template’s Name and Subject in a table view. Here are examples of templates that OneSuite users commonly create:
| Template Name | Subject Line |
| Project Progress | Project Progress |
| Project Feedback | Your Feedback Needed: [Project Name] |
| Milestone Completed | Project Milestone Completed: [Project Name] |
| Recent Services Invoice | Invoice for Recent Services |
| Invoice Reminder | Friendly Reminder: Pending Invoice |
| Project Update | Quick Update on [Project Name] |
| Payment Request | Payment Request for Invoice |
| Re: Quick idea | Re: Quick idea for your company |
For details on creating and sending invoices, see how to create recurring invoices
Not using OneSuite yet? Start your free trial →
FAQ
Can I edit a template after creating it?
Yes. Go to Settings → Email Templates, click the three-dot menu (⋮) next to the template, and select Edit.
Do templates work in all modules?
Yes. The Choose Template dropdown appears in the compose window regardless of whether you’re composing from the Email module, a CRM record, or a Client record.
Can I add images to templates?
Yes. The template editor has the same rich text toolbar as the compose window, including the image icon for inserting inline images.
Do templates auto-fill the subject line too?
Yes. When you select a template, it fills both the subject and the message body.
What is the Deliverability Score?
OneSuite scores your template out of 100 based on factors that affect email deliverability. A higher score means your email is more likely to land in the recipient’s inbox. If there are issues, the score shows the count (e.g., “90/100 (1 issue)”) and you can expand it to see details.
How many templates can I create?
Each workspace supports up to 10 templates.
What to do next
- Learn the full compose workflow: See Send and Receive Emails for details on CC, attachments, scheduling, and reply.
- Connect another email account: Add Microsoft Outlook or Gmail if you haven’t yet.
- Explore CRM records: Learn how People, Companies, and Opportunities work together so you can target the right contacts with the right templates.