
Your workspace settings hold your business’s name, logo, contact details, timezone and currency, and decide which modules your team uses. Filling them in first means your invoices carry the right letterhead and your sidebar shows only the modules you need.
In this guide you’ll learn how to:
- Fill in your business details in General
- Upload your business logo
- Understand how your details reach your invoice letterhead
- Switch modules on or off for everyone in your business
- Delete a business you no longer need
Before you start
- You open Settings from the account menu: click your name at the bottom of the sidebar, then Settings. If Settings is missing from the menu, your profile does not have access to settings. Ask an admin.
- General only appears under Workspace if your profile can edit the business’s general settings.
- Only admins can switch modules on or off. Everyone else sees a notice in place of the switches.
How to fill in your business details
You fill in your business details on Settings, Workspace, General, then click Update Business.
- Click your name at the bottom of the sidebar, then Settings.
- Under Workspace, click General. The page is titled General Settings.
- Enter your Business name. It is the only required field.
- Fill in any optional fields from the table below.
- Click Update Business. OneSuite confirms with Your business info is updated.
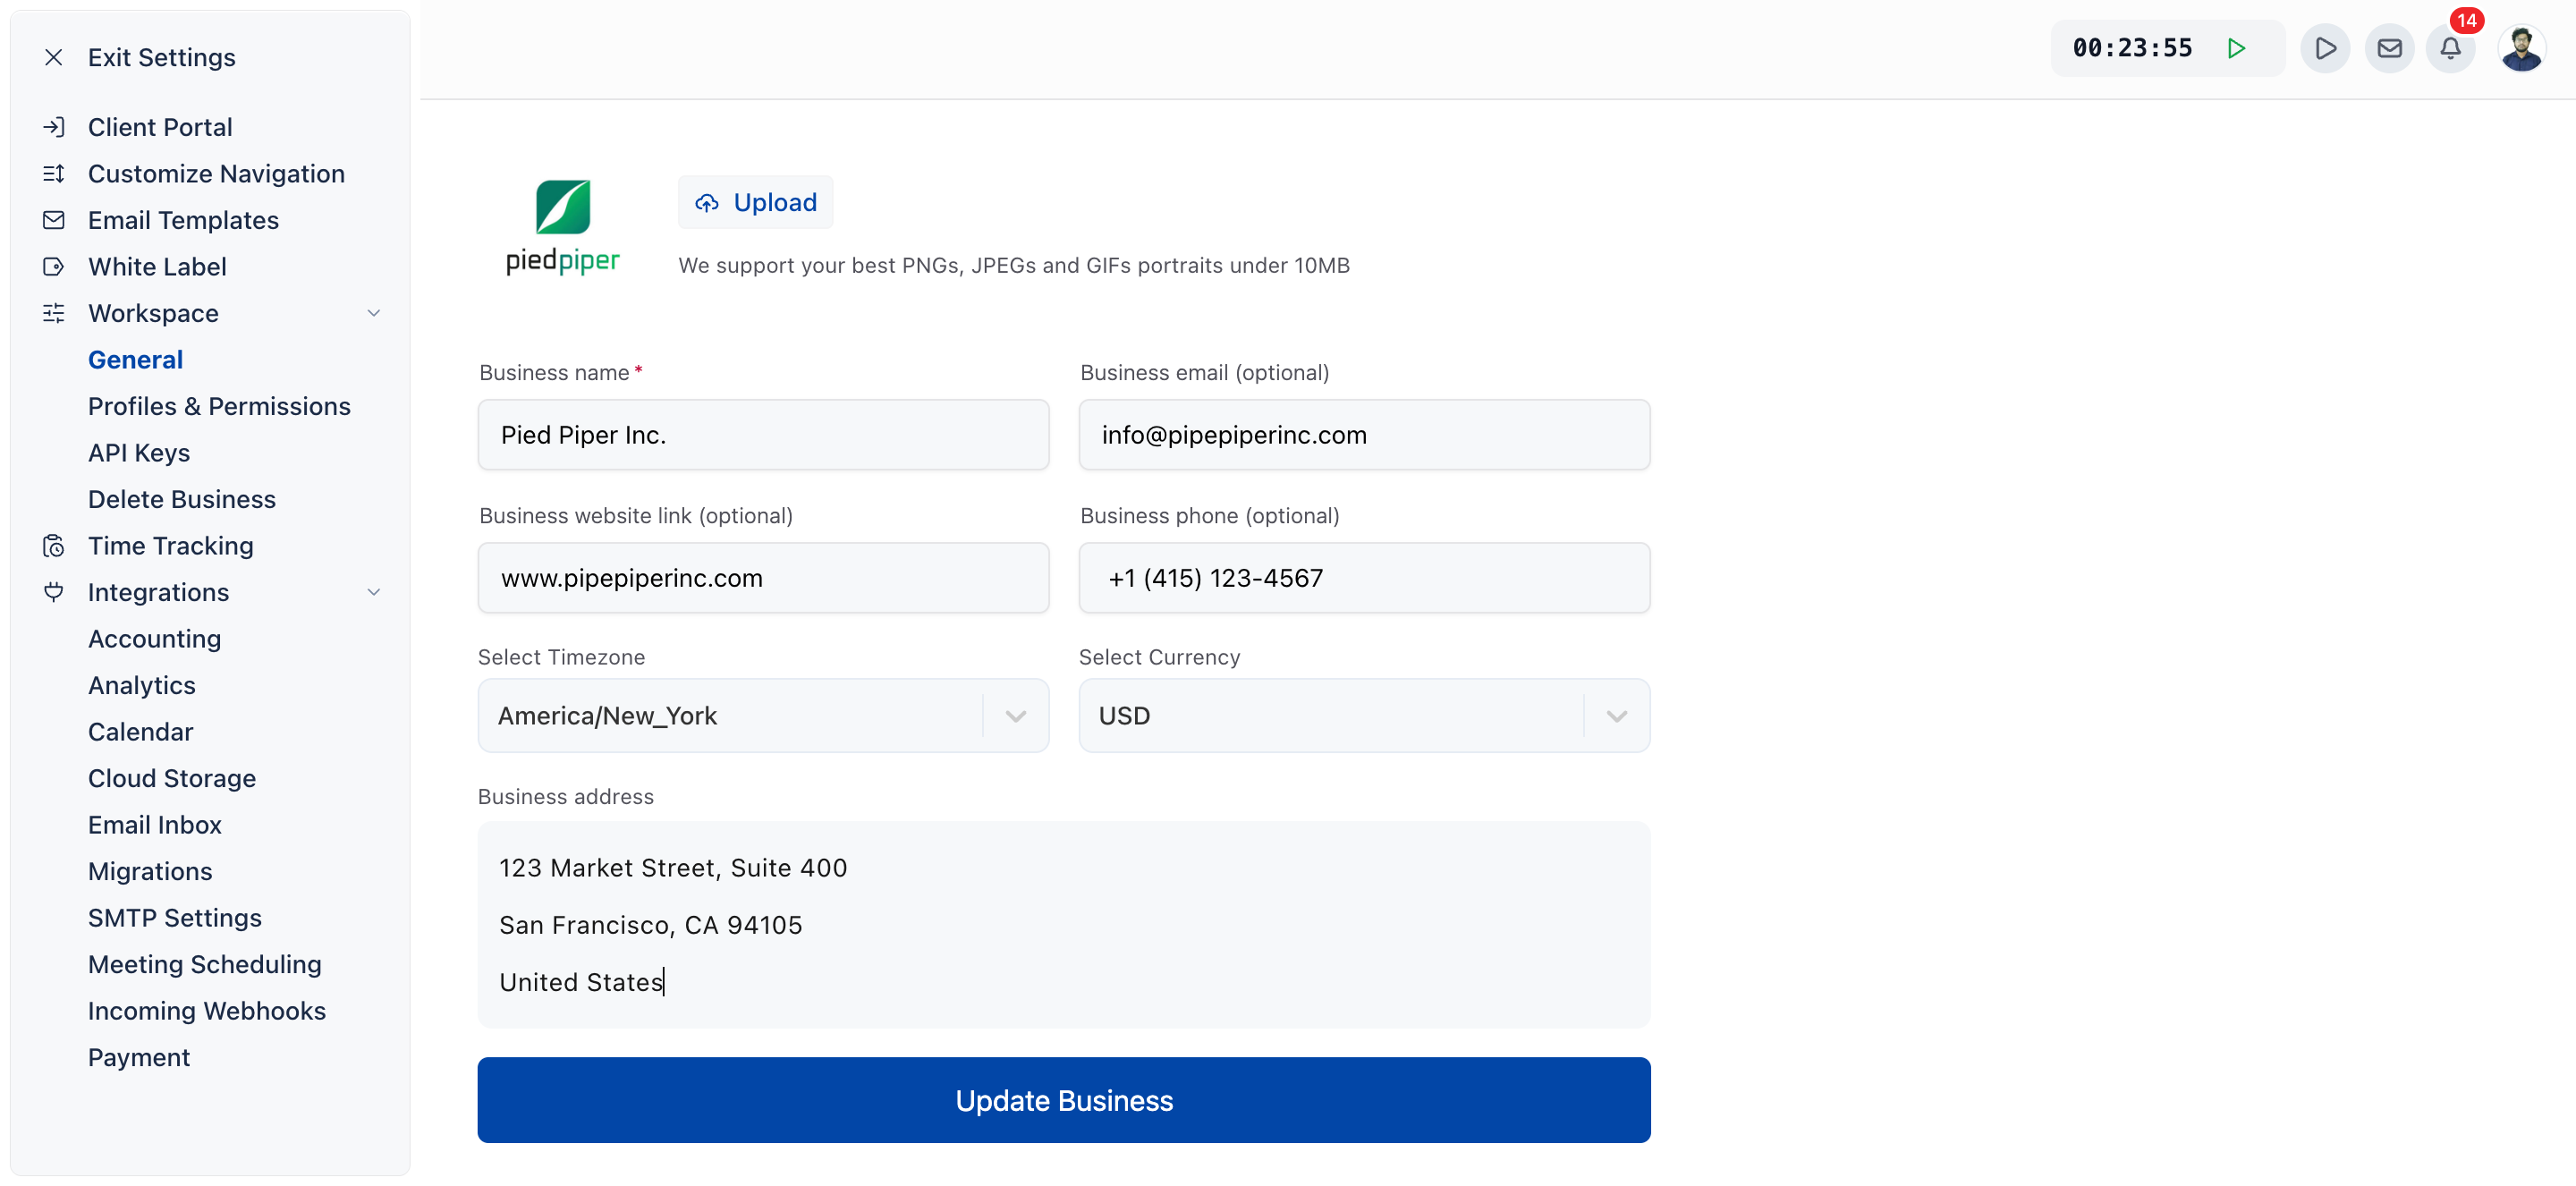
General fields
| Field | Required | Notes |
|---|---|---|
| Logo (Profile Picture) | No | Click Upload or drop an image. See the next section for accepted files. |
| Business name | Yes | Leaving it empty shows “Business name is required*”. |
| Business email (optional) | No | Must be a valid address, or you see “Please enter a valid email*”. |
| Business website link (optional) | No | For example, https://www.example.com. |
| Business phone (optional) | No | For example, 123-456-7890. |
| Timezone (Select Timezone) | No | Search the list and pick your business’s timezone. |
| Currency (Select Currency) | No | Search the list of currency codes and pick your business’s currency. |
| Business address | No | Three lines: Suite/Apartment/Road, City/State and Country/ZIP. |
How to upload your business logo
You upload your logo at the top of General, under Profile Picture, and save it with Update Business.
- On General, click Upload, or drag an image onto it.
- Pick one image file. A preview replaces the default image.
- Click Update Business to save it.
OneSuite accepts PNG, JPG, JPEG, WebP and ICO files. GIF files are not accepted. You can upload one image at a time, and there is no button to remove a logo here: to change it, upload a new one.
Your logo appears with your business in OneSuite, for example in your list of businesses and at the top of your client portal. Your invoice logo is set separately, as the next section explains.
How do your business details reach your invoices?
OneSuite copies six lines from General onto the letterhead of every new invoice: Business name, the three Business address lines, Business phone and Business email. There is no letterhead field on General itself.
You style the letterhead in Invoices, Configure, Company & brand:
- The Letterhead section shows the six lines read-only, in the order the invoice prints them. To change them, click Edit in Settings › General.
- The Look and feel section holds the invoice Logo, Banner, Style and colours. The invoice logo is uploaded here, not on General. It takes JPG, PNG or GIF files up to 5MB, at least 1500px wide.
- You can still edit the letterhead on a single invoice. That change affects only that invoice.
The Email on the letterhead is printed on the invoice. It is not the address your invoices are sent from. For every Company & brand setting, see Invoice Settings & Customization.
How to switch modules on or off
An admin switches modules on or off in Settings, Customize Navigation, in the block Modules this business uses, then clicks Save modules.
- Click your name at the bottom of the sidebar, then Settings.
- Click Customize Navigation. It is the first row in the settings sidebar.
- Under Modules this business uses, marked Admin only, flip the switch on each module card.
- Click Save modules. Until you save, the footer warns that your changes are unsaved and will change the sidebar for everyone.
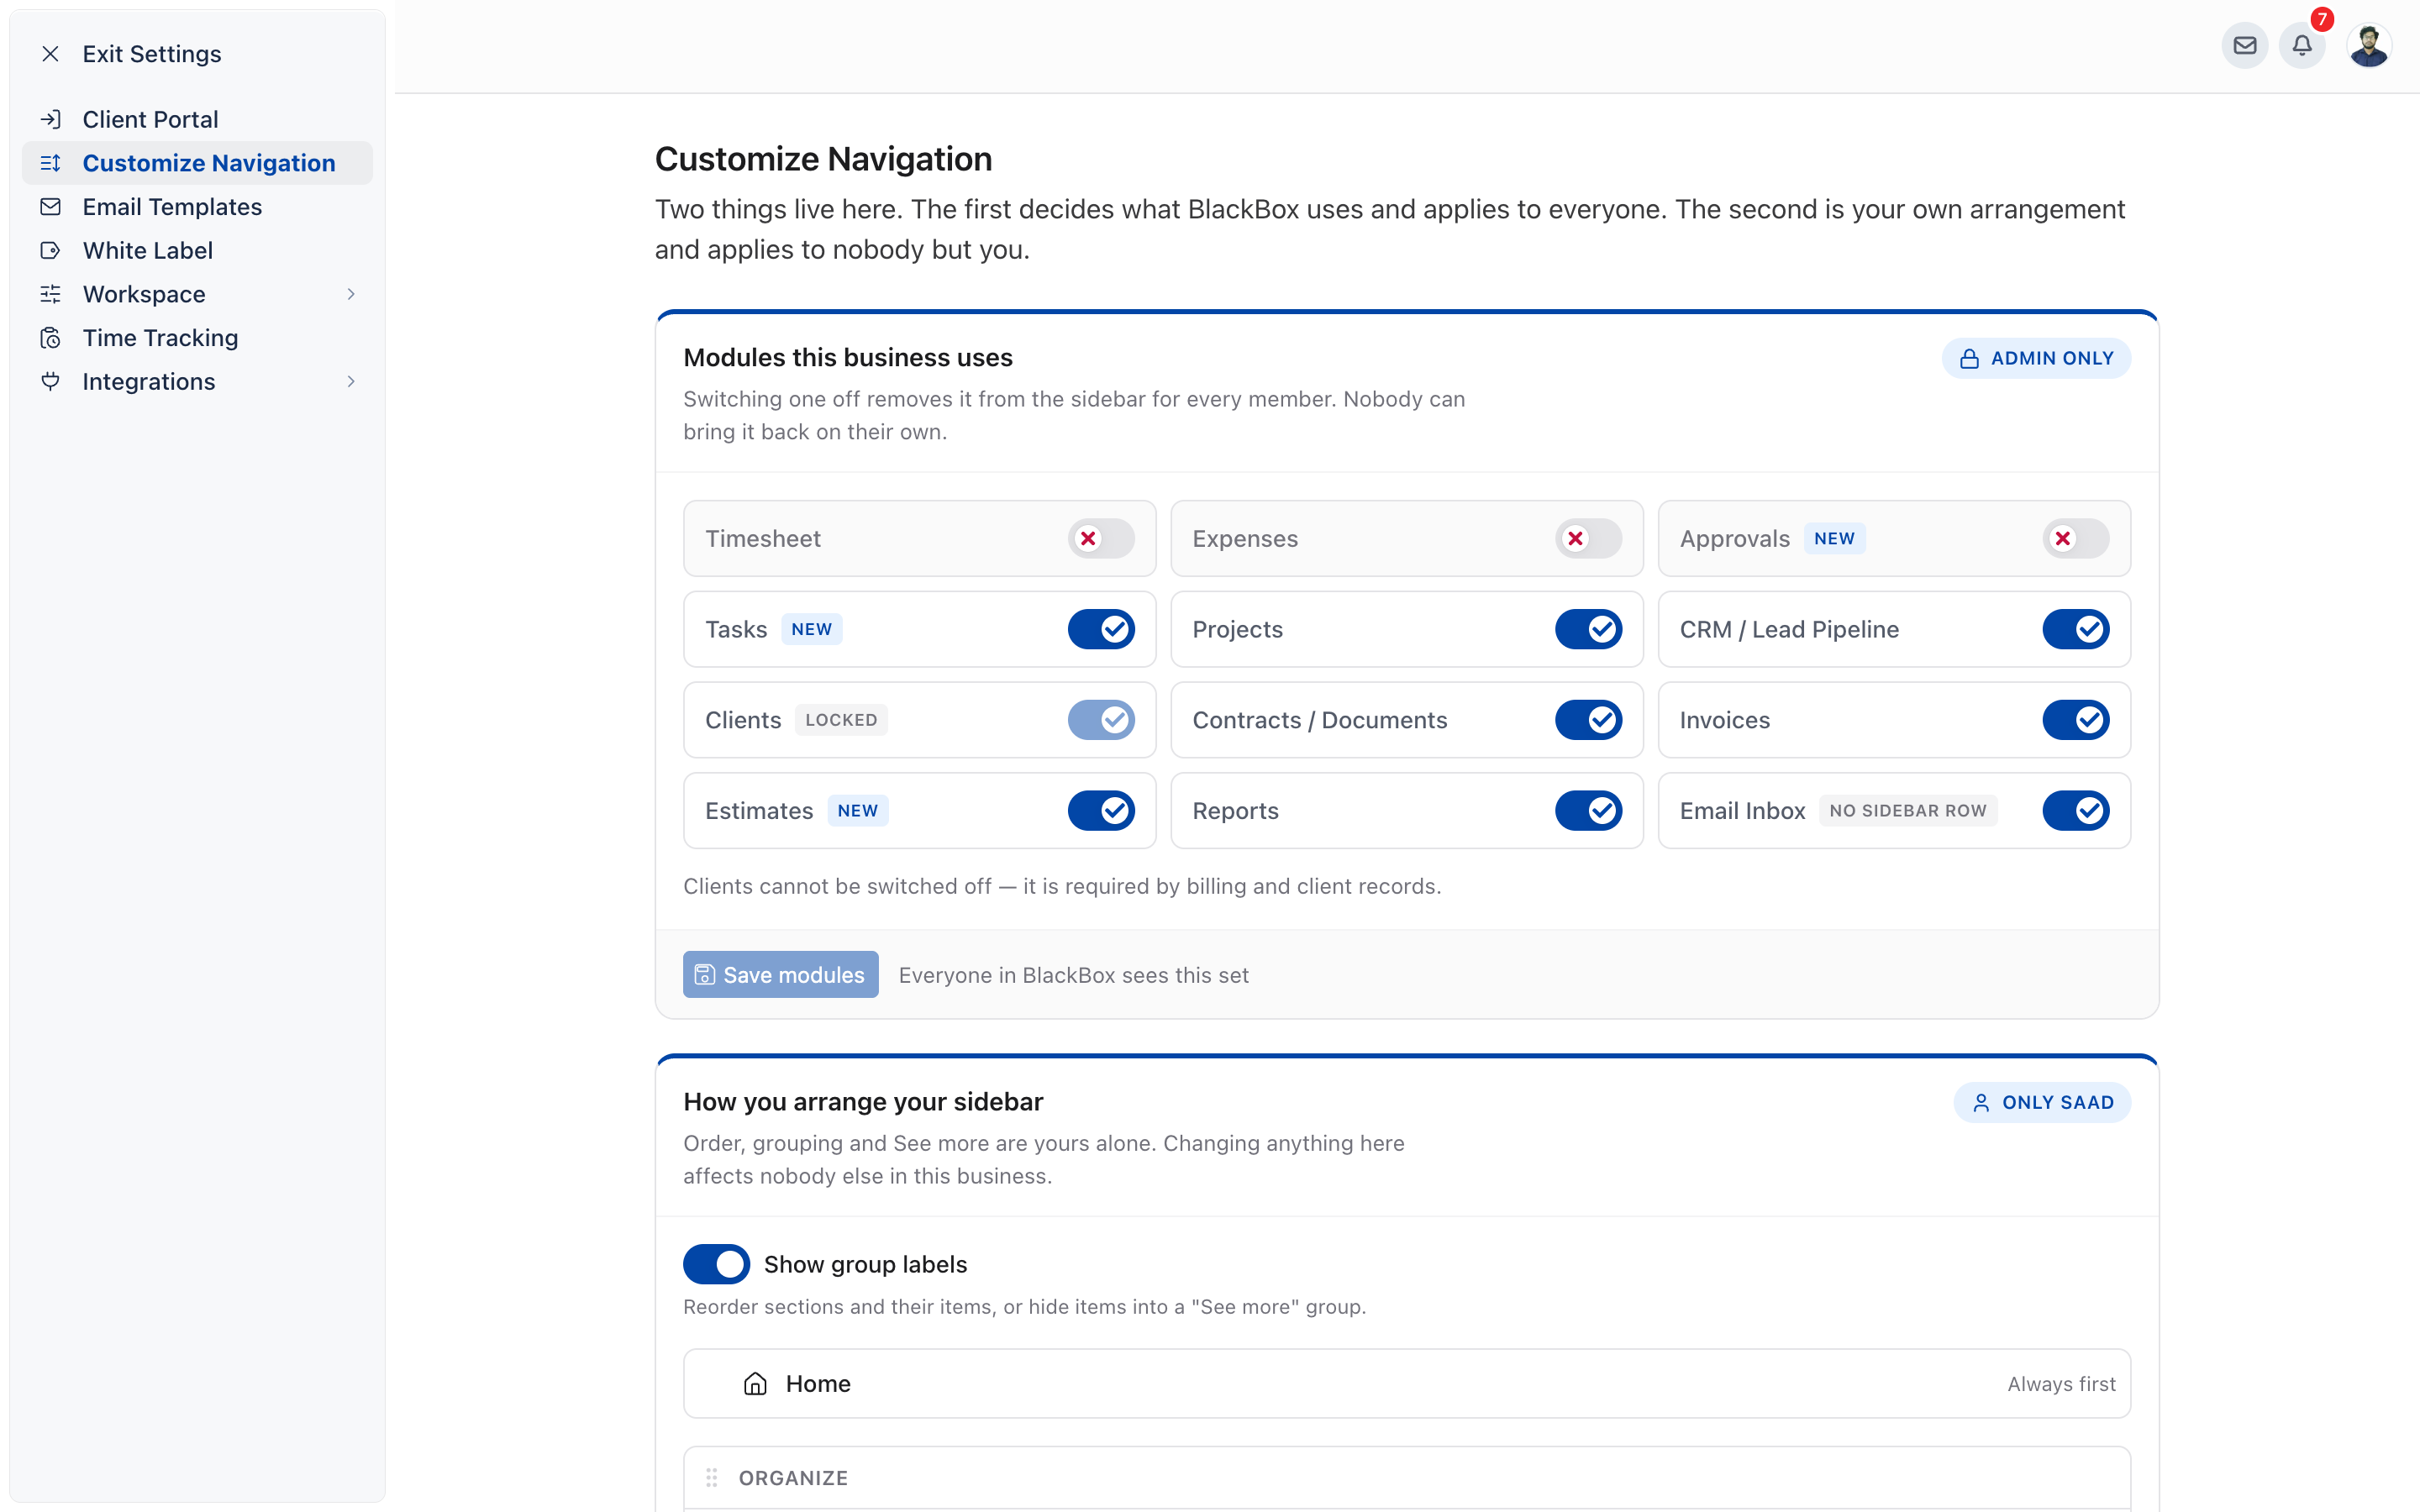
Module cards
The cards follow the sidebar order. The set you see can vary by business.
| Card | Sidebar row it controls | Notes |
|---|---|---|
| Timesheet | Timesheet | Also hides the timer in the top bar when off. |
| Expenses | Expenses | |
| Approvals | Approvals | “Approvals also runs the approval workflow. With it off, weeks cannot be submitted, approved or locked.” |
| Tasks | Tasks | |
| Projects | Projects | |
| CRM / Lead Pipeline | CRM | |
| Clients | Clients | Marked Locked. It is always on and cannot be switched off. |
| Contracts / Documents | Contracts | |
| Invoices | Invoices | |
| Estimates | Estimates | |
| Reports | Reports | |
| Email Inbox | None | Marked No sidebar row. When off, the Inbox icon in the top bar is hidden. |
Some cards carry a New badge for recently added modules.
What switching a module off does
- It changes the sidebar for everyone. The module’s row disappears for every member of the business, and nobody can bring it back on their own.
- It hides the module’s shortcuts. Switching off Timesheet hides the top-bar timer, and switching off Email Inbox hides the Inbox icon.
- It does not change anyone’s permissions. What each person can do still comes from their profile.
If you are not an admin, you see this notice instead of the switches: “Only an administrator can change which modules {business} uses. You can arrange whatever is switched on, below.”
How to arrange your own sidebar
You arrange your own sidebar in the second block on the same page, How you arrange your sidebar, and it changes nothing for anyone else.
- On Settings, Customize Navigation, scroll to How you arrange your sidebar.
- Drag rows into the order you want, or hide the ones you don’t use.
- Turn Show group labels on or off.
- Click Save my sidebar. Click Reset to default to go back to the standard layout.
For the full sidebar guide, see Navigating OneSuite.
How to delete a business
You delete a business from Settings, Workspace, Delete Business, and you confirm by typing the business name.
- Under Workspace, click Delete Business.
- Read the warning: “Once you delete this business, all of its data will be permanently removed.”
- Click Delete.
- In the Delete Business dialog, type the business name exactly as shown into Type business name.
- Click Delete. The button stays greyed out until the name matches.
Deleting a business cannot be undone. If you only want to stop paying, see How to Manage Your OneSuite Subscription instead.
Not using OneSuite yet? Start your free trial →
FAQs
Why can’t I see General in OneSuite settings?
Your profile does not have permission to edit the business’s general settings. General only appears under Workspace for people who can edit them. Ask an admin to make the change or to update your profile.
Why won’t OneSuite accept my logo file?
The file is probably a GIF or another format the uploader does not take. The General logo accepts PNG, JPG, JPEG, WebP and ICO files only. Save the image as PNG or JPG and upload it again.
How do I change the logo on my OneSuite invoices?
Upload it in Invoices, Configure, Company & brand, under Look and feel, Logo. The invoice logo is separate from the logo on General, and takes JPG, PNG or GIF files up to 5MB.
Can I just type my business details on each invoice instead?
You can edit the letterhead on a single invoice, but you would have to repeat it every time. Filling in General once means every new invoice starts with the right name, address, phone and email.
Why can’t I switch off Clients?
Clients is locked on because billing and client records depend on it, so its switch is always on and greyed out.
Does switching off a module hide it for everyone in my business?
Yes. Switching a module off in Modules this business uses removes its sidebar row for every member. To hide a module only from your own sidebar, use How you arrange your sidebar instead.
What to do next
Brand your invoices: Style the letterhead, logo and colours with Invoice Settings & Customization.
Control access: Decide what each person can see and do with How to Set Up Profiles and Permissions.
Find your way around: Learn the sidebar, top bar and account menu with Navigating OneSuite.