
A one-time invoice bills a client once, either for work your team has tracked or for line items you write yourself. OneSuite asks a few short questions, fills in what it can, and opens the invoice ready for you to check, save and send.
In this guide you’ll learn how to:
- Start an invoice from the New invoice dialog
- Walk through the wizard: projects, hours, expenses and approvals
- Create a blank invoice and write your own line items
- Fill in the main fields of the invoice editor
- Save the invoice and follow the Next steps to send it
Before you start
- You need permission to create invoices.
- The client must exist in OneSuite. You can also add one from the New invoice dialog with New client.
- Set up your letterhead, defaults and taxes first so every invoice starts right. See Invoice Settings & Customization.
- If you don’t see Invoices in the sidebar, an admin can switch it on in Settings, Customize Navigation.
How to start a new invoice
You start every invoice from Invoices, Create, which opens the New invoice dialog and asks who the invoice is for.
- Click Invoices in the sidebar.
- On the Overview tab, click Create.
- Under Who is this invoice for?, search for the client and select it. Each client shows what is waiting to bill, such as an uninvoiced amount, uninvoiced hours or a retainer balance.
- If the client has something waiting to bill, choose a
Type:
- From tracked time & expenses: auto-fill from what is waiting.
- From scratch: write your own line items.
- For From tracked time & expenses, check the
Include rows. Untick a row to leave it off:
- Tracked time & project fees, Tracked time or Project fees, depending on what is waiting
- Expenses: unbilled receipts
- Draw from retainer: pays this invoice down from the retainer balance
- Click the button at the bottom of the dialog. Its label tells you what comes next.
| Button | When you see it | What happens |
|---|---|---|
| Create invoice | One project has work and nothing needs review | OneSuite adds the lines for you and opens the invoice editor. |
| Choose projects | More than one project has work | The wizard opens so you can pick the projects. |
| Review hours | Some hours are still awaiting approval | The wizard opens so you can decide what to do about them. |
Hours and expenses start ticked when the client has them. Draw from retainer always starts unticked. To see the full wizard even when OneSuite could build the invoice directly, click Review what’s included.
How the invoice wizard works
The wizard, at New invoice, takes you from the client to a finished draft in a few questions. You only see the first two if you reached it without choosing a client.
- Who is this invoice for? Choose a client to see the projects waiting to be invoiced.
- What kind of invoice is this? Choose Tracked time, expenses or fees, or Free form for an empty invoice.
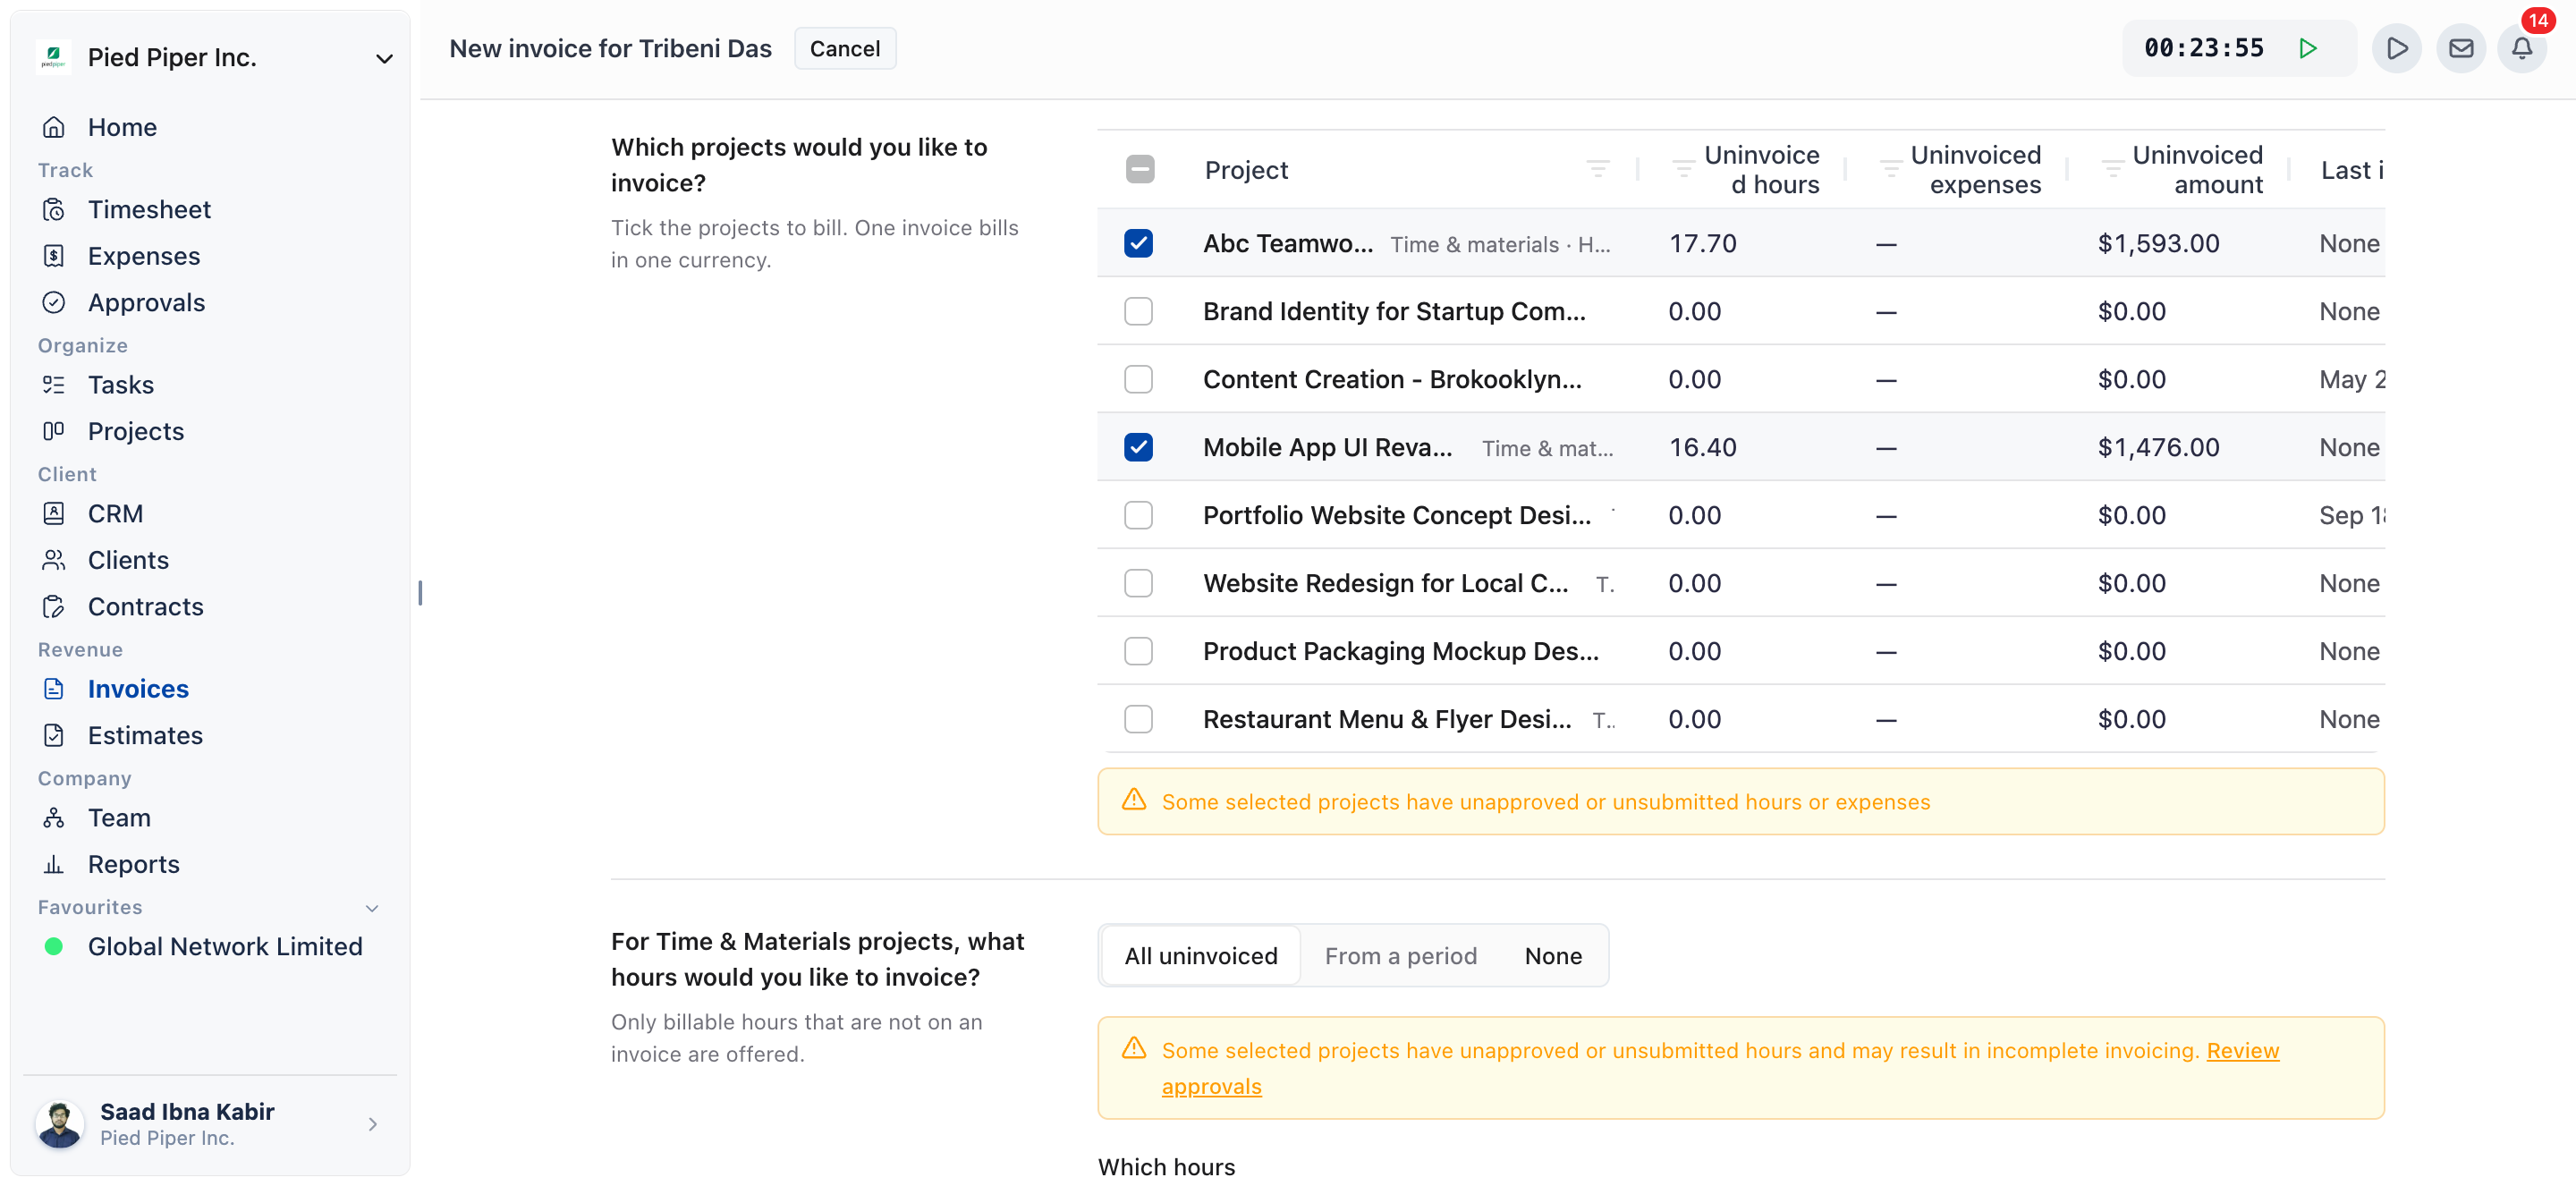
- Which projects would you like to invoice? Tick the projects to bill. Each row shows Uninvoiced hours, Uninvoiced expenses, Uninvoiced amount and Last invoice. One invoice bills in one currency.
- For Time & Materials projects, what hours would you like to invoice? Choose All uninvoiced, From a period or None. Then set Which hours, the Period if you chose one, and How to display hours. Which hours starts on All hours.
- What expenses would you like to invoice? Make the same choices for expenses. Tick Attach expense report (includes receipt images) to send the receipts with the invoice.
- Review approvals. If some selected projects have unapproved or unsubmitted hours, a notice appears. Click Review approvals to open the Approvals page and sort them out, or carry on and bill with your Which hours choice.
- Review invoice. Click Review invoice to create the draft and open it in the invoice editor.
If the client has a retainer, the wizard also asks whether to draw from it for this invoice.
For every option in the hours and expenses steps, see Invoice Generation from Billable Hours.
Why the wizard won’t continue
When something is missing, Review invoice stays greyed out and a message beside it says why:
| Message | What to do |
|---|---|
| Select at least one project. | Tick a project. |
| Selected projects bill in different currencies; invoice them separately. | Keep only projects in one currency and invoice the others separately. |
| Nothing is waiting to be invoiced on the projects you picked. | Pick other projects, or start a free-form invoice. |
| Include some hours or some expenses, or select a fixed fee project. | Include hours or expenses, or tick a Fixed Fee project. |
| Pick both dates for the hours range. | Set a start and end date for your custom period. |
How to create a blank invoice and write your own lines
You get a blank invoice by choosing From scratch in the New invoice dialog, Free form in the wizard, or a client with nothing waiting to bill.
- Click Invoices, then Create.
- Select the client under Who is this invoice for?.
- Choose From scratch. If the client has nothing waiting to bill, OneSuite tells you a blank invoice opens and skips this choice.
- Click Create invoice. An empty draft opens in the editor with this client selected.
- Add your line items and fill in the fields described below.
What to fill in on the invoice
The invoice editor shows the invoice as your client will see it, with a side panel for settings on the right.
Header
- The letterhead, copied from your business details. Edit it here to change this invoice only.
- INVOICE: the document title.
- Add a subject: a short subject line for the invoice.
- Invoice Number, Issue Date and P.O. / Ref.
- The client block: contact name, Company Name, Address, Phone and Email, filled in from the client and editable here.
Items
- Under Items, fill in each line: Item type, a description, quantity and Unit price. The amount is worked out for you.
- Click Add row for another line.
- Click Add from timesheet or Add from expenses to pull tracked work onto the invoice by hand.
- Choose a Tax and, if you use one, Tax 2 for each line. Click + Enable second tax to add the second tax column. See How to Set Taxes on Your Invoices.
- Add a discount as a Percentage or a Flat amount.
Under the items you can write a note for your client and your terms and conditions. Both start from your New invoice defaults.
Side panel
| Section | What you set |
|---|---|
| Bill to | The client, and the project if the invoice belongs to one (All projects otherwise). |
| Dates | Issued, Sent, Due and Currency. |
| Repeats | Leave on Does not repeat for a one-time invoice. |
| Payments | Whether the invoice carries an online pay link and your bank details. |
| Activity | The history of changes to this invoice. |
Due date options
Set Due with one of these payment terms: Upon receipt, Net 15, Net 30, Net 45, Net 60 or Custom. For a custom term, enter the Number of days after issue, or Pick a date.
How to save and send the invoice
Click Save at the top of the editor, then follow the Next steps in the side panel.
- Click Save. The button reads Saving… while it works.
- In the side panel, the Next block lists three
steps:
- Build the invoice
- Choose how to get paid
- Send to your client
- Click the button under the steps. It reads Set up payment while the payment step is next, and Send invoice once the invoice is ready to go.
- On the Share Invoice page, check the recipients and message, then click Send.
A draft can’t be sent until it is saved. After sending, the block reads Sent. Record a payment when it arrives. To write your message ahead of time, see How to Customize Invoice Email Messages.
Not using OneSuite yet? Start your free trial →
FAQs
How do I create an invoice in OneSuite?
Click Invoices, then Create, and choose the client under Who is this invoice for?. Pick From tracked time & expenses to have OneSuite fill in the lines, or From scratch to write them yourself.
Why didn’t the New invoice dialog ask me for a type?
The Type choice only appears when the client has tracked time, expenses or fees waiting to bill. If nothing is waiting, OneSuite opens a blank invoice for you to write.
Can I add tracked hours to an invoice I started from scratch?
Yes. In the editor, click Add from timesheet or Add from expenses under Items to pull tracked work onto the invoice.
Can I bill two currencies on one invoice?
No. One invoice bills in one currency, so projects in another currency go on a separate invoice. You can change the invoice Currency in the side panel while the invoice is still editable.
Can I just send a PDF I made elsewhere instead?
You can, but OneSuite would not know the invoice exists, so it can’t track the balance, send reminders or record the payment. Creating the invoice in OneSuite also keeps the billed hours and expenses from being invoiced twice.
How do I make this invoice repeat?
Set Repeats in the side panel of the editor and choose how often. See Creating Recurring Invoices.
What to do next
Bill tracked time: Learn every option for hours and expenses in Invoice Generation from Billable Hours.
Bill on a schedule: Set an invoice to repeat with Creating Recurring Invoices.
Record the payment: When the client pays, follow How to Record Invoice Payments.