
Expenses record the costs you incur on a project, such as software, travel or materials. Log each cost against a project, mark it billable so it can reach the client’s invoice, and attach the receipt so the claim holds up later.
In this guide you’ll learn how to:
- Track a single expense
- Create expenses in bulk from receipt files
- Mark an expense billable or reimbursable
- Submit a week of expenses for approval
- Find the invoice an expense was billed on
Before you start
- If you don’t see Expenses in the sidebar, an admin can switch it on in Settings, Customize Navigation.
- At least one expense category must exist, because Category is a required field. See Expense Categories.
- You need a project to log against. If the project picker shows No projects assigned to this person, ask a project manager to add you to the project.
How to track an expense
You track an expense by clicking Track expenses on the Expenses page and filling in the date, project, category and amount.
- Click Expenses in the sidebar.
- Stay on the All expenses tab and click Track expenses.
- Check the Date. It starts on today’s date.
- Choose a Project.
- Choose a Category.
- Enter the Amount.
- Add Notes if the cost needs explaining.
- Under Attach receipt to expense, click Add a receipt and choose the file.
- Leave This expense is billable ticked if the client should pay for this cost.
- Tick Request reimbursement for this expense if you paid with personal funds and need the money back.
- Click Save expense, or click Save & add another to log the next cost without closing the dialog.
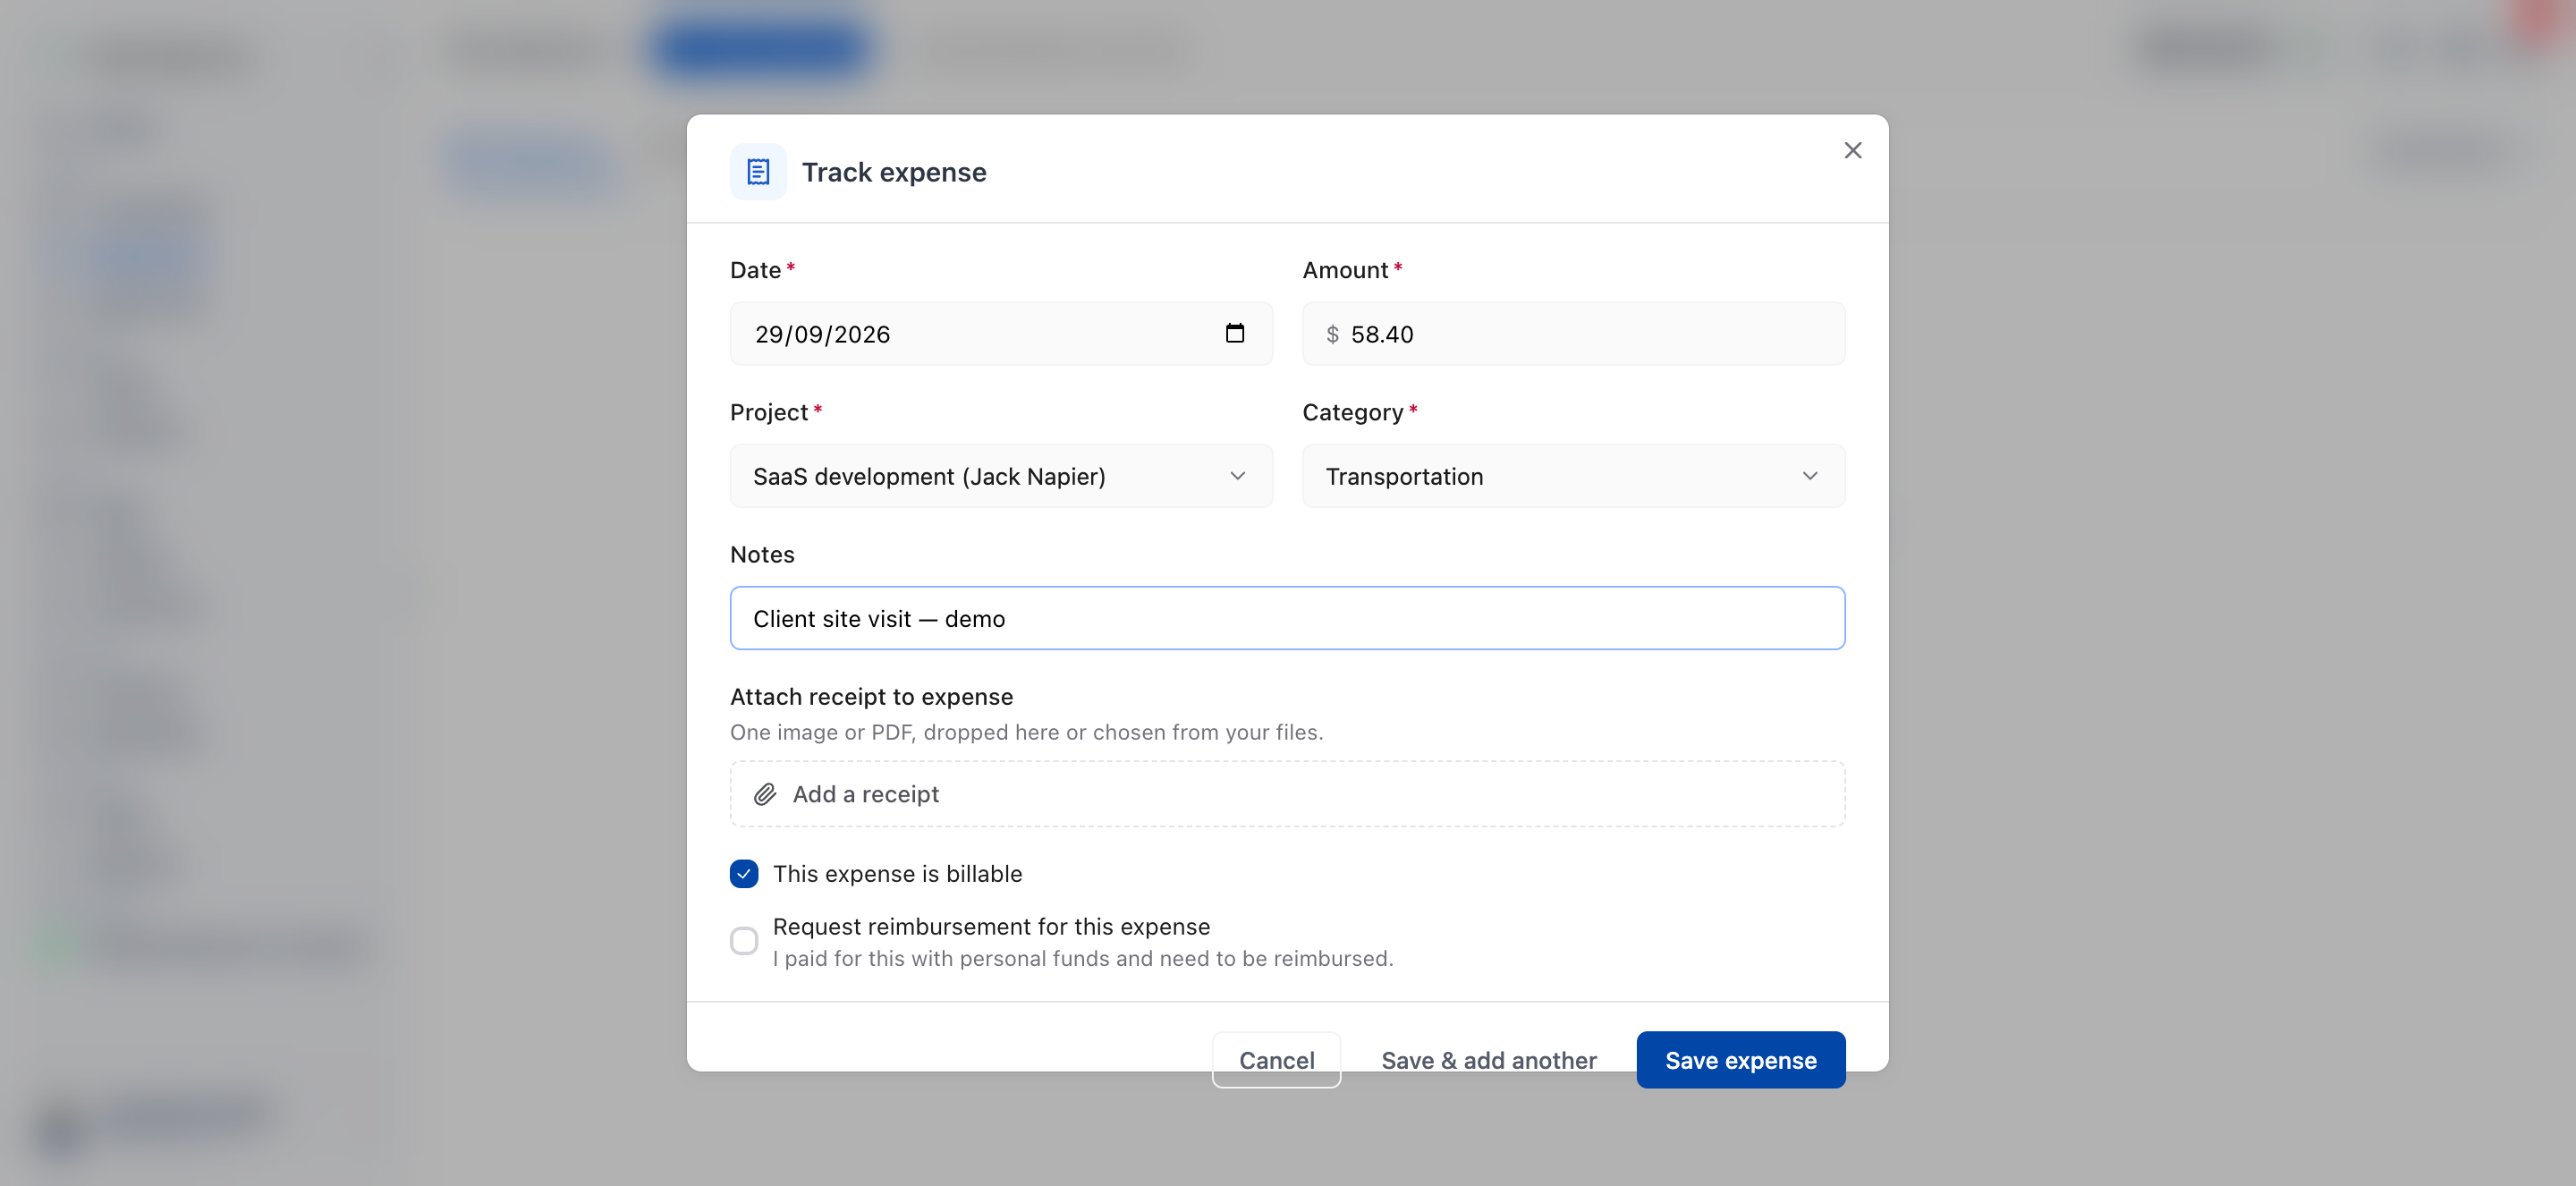
Required fields and limits
| Field | Required | Notes |
|---|---|---|
| Date | Yes | Starts on today’s date. |
| Project | Yes | Lists the projects you can log against. |
| Category | Yes | Lists active expense categories only. |
| Amount or Quantity | Yes | 0 or more. |
| Notes | No | Up to 2,000 characters. |
| Receipt | No | One file per expense: PNG, GIF, JPG or JPEG, HEIC, HEIF or PDF. |
When Amount becomes Quantity
If the category you pick has both a unit name and a unit price, the
Amount field becomes Quantity. Enter
the number of units and OneSuite works out the total from the unit
price. For a mileage category priced per mile, enter 120
for 120 miles, not the cash total.
When billable switches off on its own
This expense is billable starts ticked. If you pick a project whose type is Non-Billable before you touch the checkbox, OneSuite unticks it for you.
How to create expenses in bulk from receipts
You can create one expense per receipt by uploading several receipt files at once.
- Click Expenses in the sidebar.
- Click Create expenses from files.
- Select the receipt files. You can pick more than one.
- Wait while the list shows Creating one expense per receipt….
- Open each new expense with Edit and check its details before you submit it.
OneSuite accepts PNG, GIF, JPG or JPEG, HEIC, HEIF and PDF files. It shows an error for any other file you pick and skips it, while the valid files still upload.
Billable and reimbursable are different things
The two checkboxes answer different questions, and you set them independently.
| Checkbox | Question it answers | Starts as |
|---|---|---|
| This expense is billable | Should the client pay for this? | Ticked |
| Request reimbursement for this expense | Should the business pay me back? | Not ticked |
A taxi you paid for yourself and charge on to the client is both. Software paid on the company card and charged on is billable but not reimbursable.
The reimbursement checkbox only appears when Expense reimbursement is switched on in Settings, Time Tracking, Preferences. Open Settings from the account menu: click your name at the bottom of the sidebar, then Settings. With the setting off, the checkbox is hidden, and expenses already flagged keep their flag.
Once someone marks a reimbursable expense as paid, the row shows Paid next to Billable and Reimbursable.
How to submit expenses for approval
You submit expenses a week at a time, and the week’s unsubmitted time goes with them as one package.
- Click Expenses in the sidebar.
- Find the week you want to send.
- Click Submit for approval on that week.
- Check the summary in the dialog that opens, then click Submit for approval.
The week then shows Pending approval. A reviewer approves it or sends it back with a reason. A sent-back week shows Sent back: fix the expenses and click Resubmit for approval.
The submit button only appears when Timesheet approvals is switched on in Settings, Time Tracking, Approval Policy. If the button is greyed out, OneSuite tells you why, for example Nothing in this week is waiting to be submitted.
Expense statuses and flags
| What you see | Where | What it means |
|---|---|---|
| No status | Week | Nothing in the week has been submitted yet. |
| Pending approval | Week | Submitted and waiting for a reviewer. |
| Approved | Week | Signed off. Approved expenses can no longer be changed. |
| Sent back | Week | A reviewer returned the week with a reason. Fix it and resubmit. |
| Padlock | Expense | The expense is locked and can no longer be changed. |
| Billable | Expense | The client can be charged for it. |
| Reimbursable | Expense | The business owes the person who paid. |
| Paid | Expense | The reimbursement has been marked as paid. |
How to find the invoice an expense was billed on
Open the expense’s actions menu and click View the invoice to go straight to the invoice it was billed on.
This option only appears when the expense is on an invoice. When you edit an invoiced expense, OneSuite warns you that editing it will not update the invoice, and its date, project, category and billable flag are fixed.
Not using OneSuite yet? Start your free trial →
FAQs
Why can’t I edit my expense in OneSuite?
You can’t edit an expense once it is approved or locked. The actions menu tells you which: Approved expenses can no longer be changed. or This expense is locked and can no longer be changed. Ask a reviewer to withdraw the approval, or an admin to change the lock.
Why is the project list empty when I track an expense?
The project picker only lists projects you can log against. If it shows No projects assigned to this person, ask a project manager to add you to the project.
Do I have to attach a receipt to an expense?
No. The form saves without a receipt, although your business may still ask for one. Each expense takes one image or PDF.
Can I just add costs to the invoice directly instead?
You can add a line to an invoice by hand, and for a one-off that works. Tracking the cost as an expense is better when you want the receipt kept with it, the cost reviewed with the week’s time, or the spend counted on the project.
What happens to a billable expense after I save it?
It waits on its project until someone invoices it. When you build an invoice from tracked time and expenses, only billable expenses that have not been invoiced are offered.
How do I delete an expense?
Open the expense with Edit, click Delete, then confirm Delete. The expense and any receipt attached to it are removed, and this cannot be undone.
What to do next
Set up your categories: Create the categories your team picks from in Expense Categories.
Get your week approved: See what reviewers do with your submission in Approving Timesheets and Expenses.
Bill what you spent: Pull billable expenses onto an invoice with Invoice Generation from Billable Hours.