
A saved report keeps its period and filters so you can open it again in one click, and a scheduled report regenerates itself and emails the result. Save the reports you run every week or month so nobody has to rebuild them or remember to send them.
In this guide you’ll learn how to:
- Save a report and share it with your team
- Build a custom report
- Schedule a saved report and email it as a CSV
- Rename, duplicate and delete saved reports
Before you start
- If you don’t see Reports in the sidebar, an admin can switch it on in Settings, Customize Navigation.
- You need permission to view reports. Profitability, Contractor and Invoicing each need a permission of their own.
- Everyone with access to Reports can create, view and share their own saved reports.
How to save a report
Set up the report the way you want it, click Save report, name it and choose who can see it.
- Click Reports in the sidebar and open the tab you want, for example Time or Invoicing.
- Set the period, sub-tab and filters.
- Click Save report. The Save report dialog opens.
- Enter a Report name.
- Under Permissions, choose Don’t share this report or Share with team. Click What will people see? to read what sharing means.
- Click Save report.
Once a saved report is open, the Save report button shows the report’s name instead. Clicking it opens Update report, which saves over the report. Click Save as new to keep the original and store your changes as a second report.
Note: sharing a report also shares the data it shows. The dialog says it plainly: “Granting access to a report also exposes the underlying data it displays.”
How to build a custom report
A custom report lets you pick the fields and metrics yourself. You start it from the New report menu at the top of the Reports page.
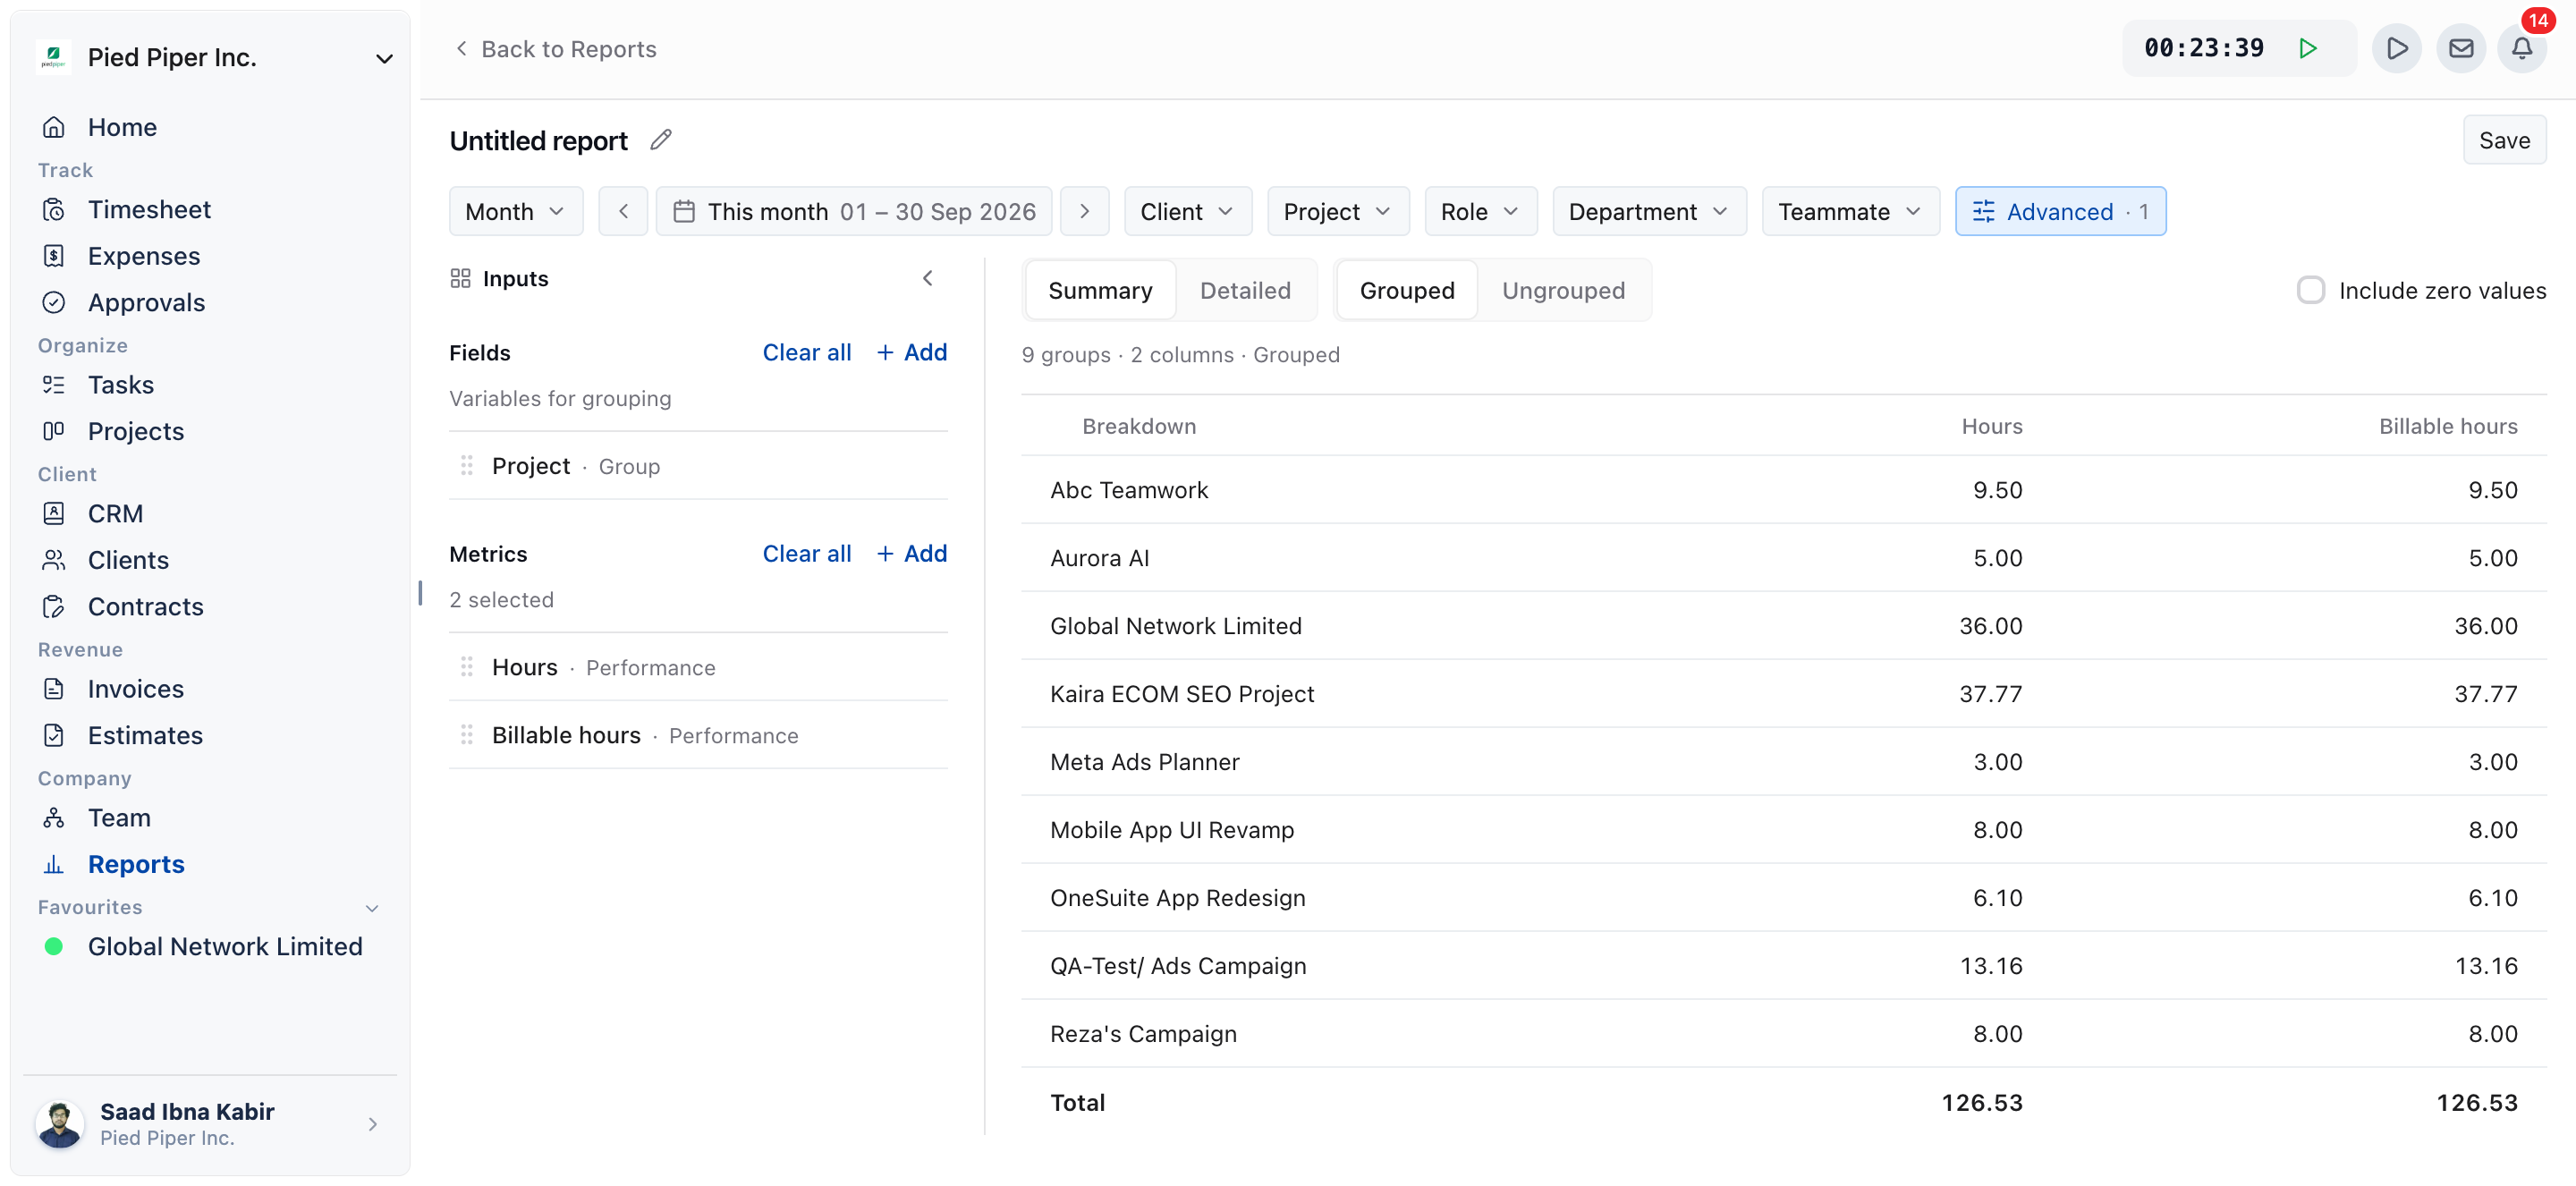
- Click New report, then Custom report. The builder opens as Untitled report.
- Click the pencil beside the name to rename it.
- Set the period, and narrow it with Client, Project, Role, Department or Teammate if you need to.
- Under Inputs, click Add beside Fields to choose what the rows are grouped by, and beside Metrics to choose the numbers to show.
- Choose Summary or Detailed, and Grouped or Ungrouped. Tick Include zero values to keep rows with nothing in them.
- To filter on a number, click Advanced. Under Rules, click Add rule, then pick a Metric, an Operator and a Value. Use Apply to to check the rule against Each row or against one of your grouping fields. Rules combine with AND. Click Done.
- Click Save, then name the report in the Save report dialog and click Save report.
If nothing matches, the report says “No data matches this report.” Loosen a rule or widen the period. You can collapse the Inputs panel to give the results more room.
How to schedule a report
A scheduled report regenerates on a set cadence and can email itself as a CSV. You set it up in the same dialog you use to save.
- Open the report and click Save report (or the report’s name, if it is already saved).
- Under Recurring schedule, tick Regenerate this report on an ongoing basis.
- Under Repeats, choose Daily, Weekly or Monthly. The dialog shows the date the next report is generated.
- Under Export, tick Email an export of this report.
- Fill in Send to. Separate addresses with commas. Leave it empty and it goes to you. You can list up to 25 addresses.
- Click Save report or Update report.
Custom reports can’t be scheduled yet. Their dialog says “Custom reports are assembled in your browser, so they can’t be regenerated on a schedule yet.” Every other report can be.
| Schedule field | Options |
|---|---|
| Repeats | Daily, Weekly, Monthly |
| Email an export of this report | On or off. When on, the export arrives as a CSV attachment. |
| Send to | Up to 25 email addresses, separated by commas. Empty means it goes to you. |
How to manage saved reports
Open the Saved reports tab to see every report you saved and every report shared with you.
- Filter with All, Your reports or Shared with you, and with All or Custom only.
- Type in Search saved reports to find one by name.
- The table shows each report’s Name, Report type, Owner, Permissions, Schedule and Created date.
- The owner can change Permissions straight from the row.
Open a row’s menu for these actions:
| Action | What it does |
|---|---|
| Open | Opens the report. |
| Rename | Changes its name. Owner only. |
| Duplicate | Makes a copy you can change. |
| Delete | Removes it. Owner only. |
The Schedule column shows the cadence, the next run date and Emailed when an export is sent. Hover over it to see who it is Sent to and when it was last sent. It can also show Has not run yet, Last run failed or Last run skipped.
Not using OneSuite yet? Start your free trial →
FAQs
Who receives a scheduled report?
Everyone listed in Send to. If you leave the field empty, the report goes to you.
Can I send a scheduled report to someone outside my business?
Yes. Send to takes any valid email addresses, up to 25. Be deliberate about it, because the email carries the report’s data to whoever receives it.
Why can’t I schedule my custom report?
Custom reports are assembled in your browser, so OneSuite can’t regenerate them on a schedule yet. Save it and open it when you need it, or schedule one of the standard report tabs instead.
Can I just export the report each month instead?
You can, and for a report you rarely run that is simpler. Schedule it when the report matters enough that forgetting to send it is the real risk.
Does sharing a report show my team data they can’t otherwise see?
It can. Granting access to a report also exposes the underlying data it displays, so check what the report contains before you choose Share with team.
What is the difference between Update report and Save as new?
Update report saves your changes over the report you opened. Save as new leaves the original alone and stores your current setup as a second report.
What to do next
Learn the tabs first: See what each report covers in Reports Overview.
Make the numbers accurate: Set rates and budgets per project with How to Set Up Project Billing and Budgets.
Bill what is waiting: Turn uninvoiced hours into an invoice with Invoice Generation from Billable Hours.