Connect Moneris so your clients can pay invoices online through it. First, create a Moneris Checkout profile in the Merchant Resource Center. Then go to Settings > Integrations > Payment and click Connect on the Moneris card. Paste your Store ID, API token and Checkout ID, and click Save. Moneris confirms each payment when your client finishes paying, so you do not need a webhook. A webhook is how a payment service tells OneSuite that a client has paid.
In this guide you’ll learn how to:
- Find your Moneris Store ID and API token
- Create a Moneris Checkout profile and find its Checkout ID
- Connect Moneris to OneSuite
- Switch Moneris on for an invoice
Before you start
- You need access to Settings. If you can’t see Integrations, ask an admin.
- Use your live Moneris store (also called production), not the testing one. A live store takes real payments.
- Your Moneris user needs full admin access to set up Moneris Checkout. If you don’t have it, ask your store administrator.
- Your API token is a private code from Moneris. It lets OneSuite work with your Moneris account.
- These steps are for a store that you manage in the Merchant Resource Center and that charges in Canadian dollars.
What does OneSuite ask for when you connect Moneris?
| Field | Where to find it | Required |
|---|---|---|
| Store ID | Look in the welcome email Moneris sent when your account was opened. It looks like gwca000000. | Yes |
| API token | In the Merchant Resource Center, open Admin, then Store Settings, then API Token. | Yes |
| Checkout ID | In the Merchant Resource Center, open Admin, then Moneris Checkout Config, then Create Profile. The Checkout ID is at the top of the profile. | Yes |
How do I connect Moneris to OneSuite?
- In the Merchant Resource Center, open Admin, then Store Settings. Copy your API token.
- Open Admin, then Moneris Checkout Config. Click Create Profile.
- Set the transaction type to Purchase.
- Copy the Checkout ID shown at the top of the profile.
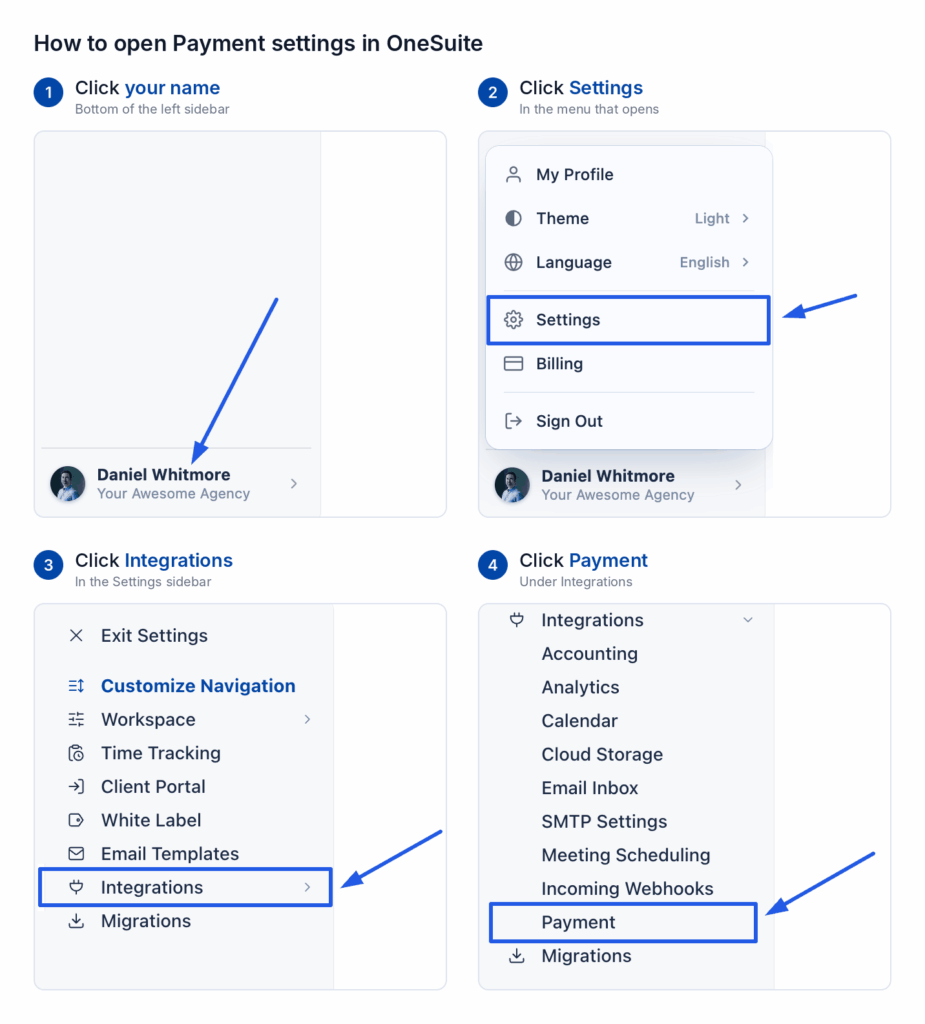
- In OneSuite, click your name at the bottom of the sidebar, then click Settings.
- Under Integrations, click Payment.
- On the Payment Methods page, find Moneris and click Connect.
- Paste your Store ID, API token and Checkout ID.
- Click Save.
How do I check if it worked?
The Moneris card on the Payment Methods page now says Connected instead of Not connected. You also see Moneris marked Connected under Invoices > Configure > Getting paid > Online payments.
OneSuite switches a connected gateway on for every new invoice. An invoice you created earlier keeps its own choice. To use Moneris on an older invoice:
- Open the invoice.
- Switch Moneris on in its Payments panel.
- Save the invoice and send it again.
FAQs
Do I need a webhook for Moneris?
No. A payment is confirmed with Moneris as soon as your client finishes paying. You have nothing to set up for it.
Where do I find my Moneris Store ID?
Check the welcome email from Moneris. Moneris sent it when your account was opened. The ID looks like gwca000000. You will not find it in Store Settings.
How does a client pay a Moneris invoice?
Your client pays on a secure Moneris Checkout form. OneSuite opens the form for them. OneSuite marks the invoice paid once Moneris confirms the payment.
What to do next
See every gateway: Browse all the guides in Payment Integration.
Record the money that arrives: Log payments made outside a gateway with How to Record Invoice Payments.