Connect Authorize.Net so your clients can pay invoices online through it. Go to Settings > Integrations > Payment and click Connect on the Authorize.Net card. Paste your API Login ID, Transaction Key and Signature Key, choose a Currency, and click Save.
In this guide you’ll learn how to:
- Find your Authorize.Net API Login ID, Transaction Key and Signature Key
- Connect Authorize.Net to OneSuite
- Avoid breaking the connection when you generate a new key
- Switch Authorize.Net on for an invoice
Before you start
- You need an Authorize.Net merchant account and access to the Merchant Interface.
- You need access to Settings. If you can’t see Integrations, ask an admin.
- The Transaction Key and Signature Key are private codes from Authorize.Net. They let OneSuite work with your Authorize.Net account. Keep them private.
- You generate both keys yourself. Authorize.Net shows each key when you generate it. Copy them straight away.
What does OneSuite ask for when you connect Authorize.Net?
| Field | Where to find it | Required |
|---|---|---|
| API Login ID | In the Merchant Interface, open Account, then Settings, then Security Settings, then API Credentials and Keys. | Yes |
| Transaction Key | On the same page. A new key stops the old one from working. | Yes |
| Signature Key | On the same page. Authorize.Net signs every payment notification with it. Without it, OneSuite cannot record any payment. | Yes |
| Currency | Starts as US Dollar (USD). OneSuite uses it when an invoice has no currency of its own. | No |
How do I connect Authorize.Net to OneSuite?
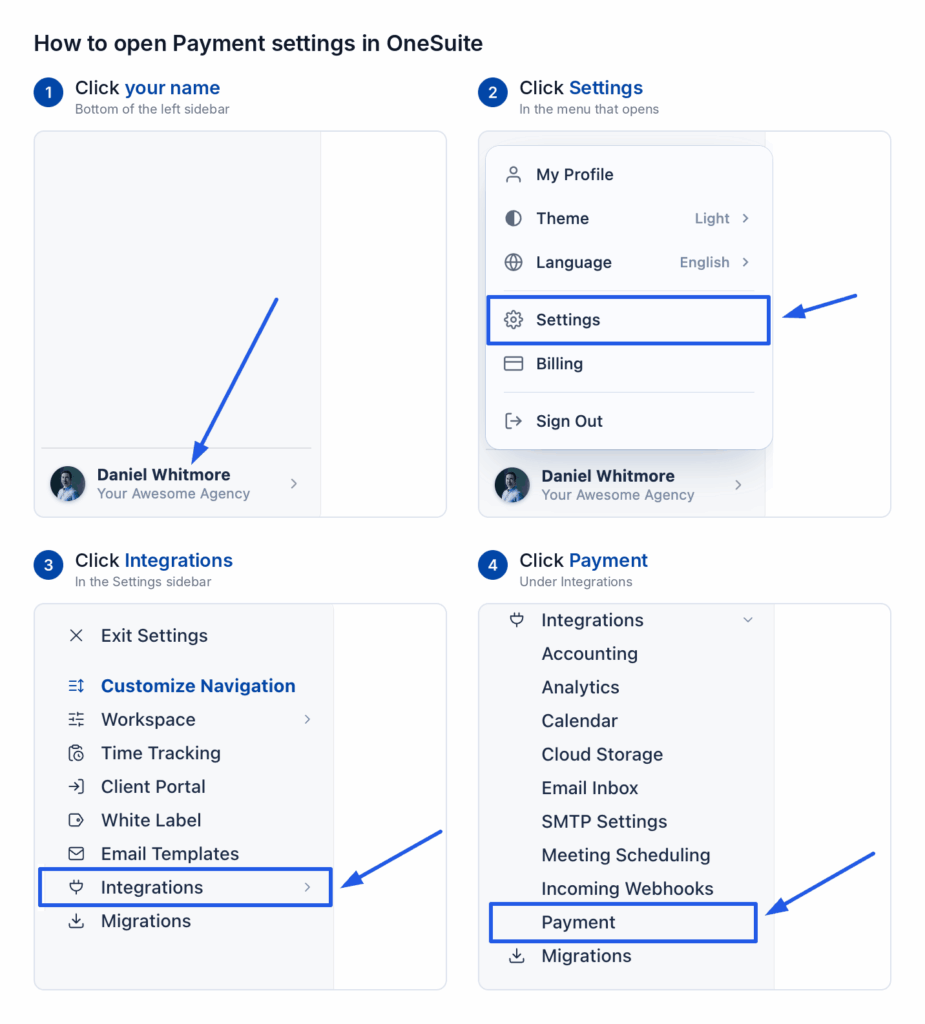
- Click your name at the bottom of the sidebar, then click Settings.
- Under Integrations, click Payment.
- On the Payment Methods page, find Authorize.Net and click Connect.
- In the Authorize.Net Merchant Interface, open the API Credentials and Keys page.
- Copy your API Login ID.
- Paste it into API Login ID in OneSuite.
- Generate a Transaction Key.
- Generate a Signature Key.
- Paste the Transaction Key into Transaction Key.
- Paste the Signature Key into Signature Key.
- Check the Currency.
- Click Save.
How do I check if it worked?
The Authorize.Net card on the Payment Methods page now says Connected instead of Not connected. You also see Authorize.Net marked Connected under Invoices > Configure > Getting paid > Online payments.
OneSuite switches a connected gateway on for every new invoice. An invoice you created earlier keeps its own choice. To use Authorize.Net on an older invoice:
- Open the invoice.
- Switch Authorize.Net on in its Payments panel.
- Save the invoice and send it again.
If something goes wrong
- You generated a new Transaction Key. The new key stops the old one from working. Paste the new key into Transaction Key in OneSuite straight away. Then click Save.
- Your Authorize.Net menu does not match the path above. Follow Authorize.Net’s guide to API credentials and keys.
FAQs
Why does OneSuite need the Signature Key?
Authorize.Net signs each payment notification with this key. OneSuite cannot record a payment on the invoice without it.
What happens if I generate a new Transaction Key?
Your old Transaction Key stops working. Paste the new key into OneSuite straight away.
Does Authorize.Net need a webhook in OneSuite?
No. A webhook is a web address your payment provider uses to tell OneSuite that a client has paid. The Authorize.Net dialog shows no webhook URL, so you have nothing to add in Authorize.Net.
What to do next
See every gateway: Browse all the guides in Payment Integration.
Record the money that arrives: Log payments made outside a gateway with How to Record Invoice Payments.