
An estimate is a priced quote you send a client before the work starts, and the client accepts or declines it from a link. Once it is accepted, you create an invoice draft from it in one click, so the decision is on record before you bill.
In this guide you’ll learn how to:
- Build an estimate with line items, taxes and a discount
- Send it to your client for a decision
- Record an accepted or declined decision yourself
- Turn an accepted estimate into an invoice
Before you start
- If you don’t see Estimates in the sidebar, an admin can switch it on in Settings, Customize Navigation.
- You need access to invoices. Estimates uses the same permission as Invoices, and it is hidden from clients.
- Estimates share your invoice letterhead and tax setup. Set your letterhead in Invoices, Configure, Company & brand, and your tax rates in Invoices, Configure, Taxes.
How to create an estimate
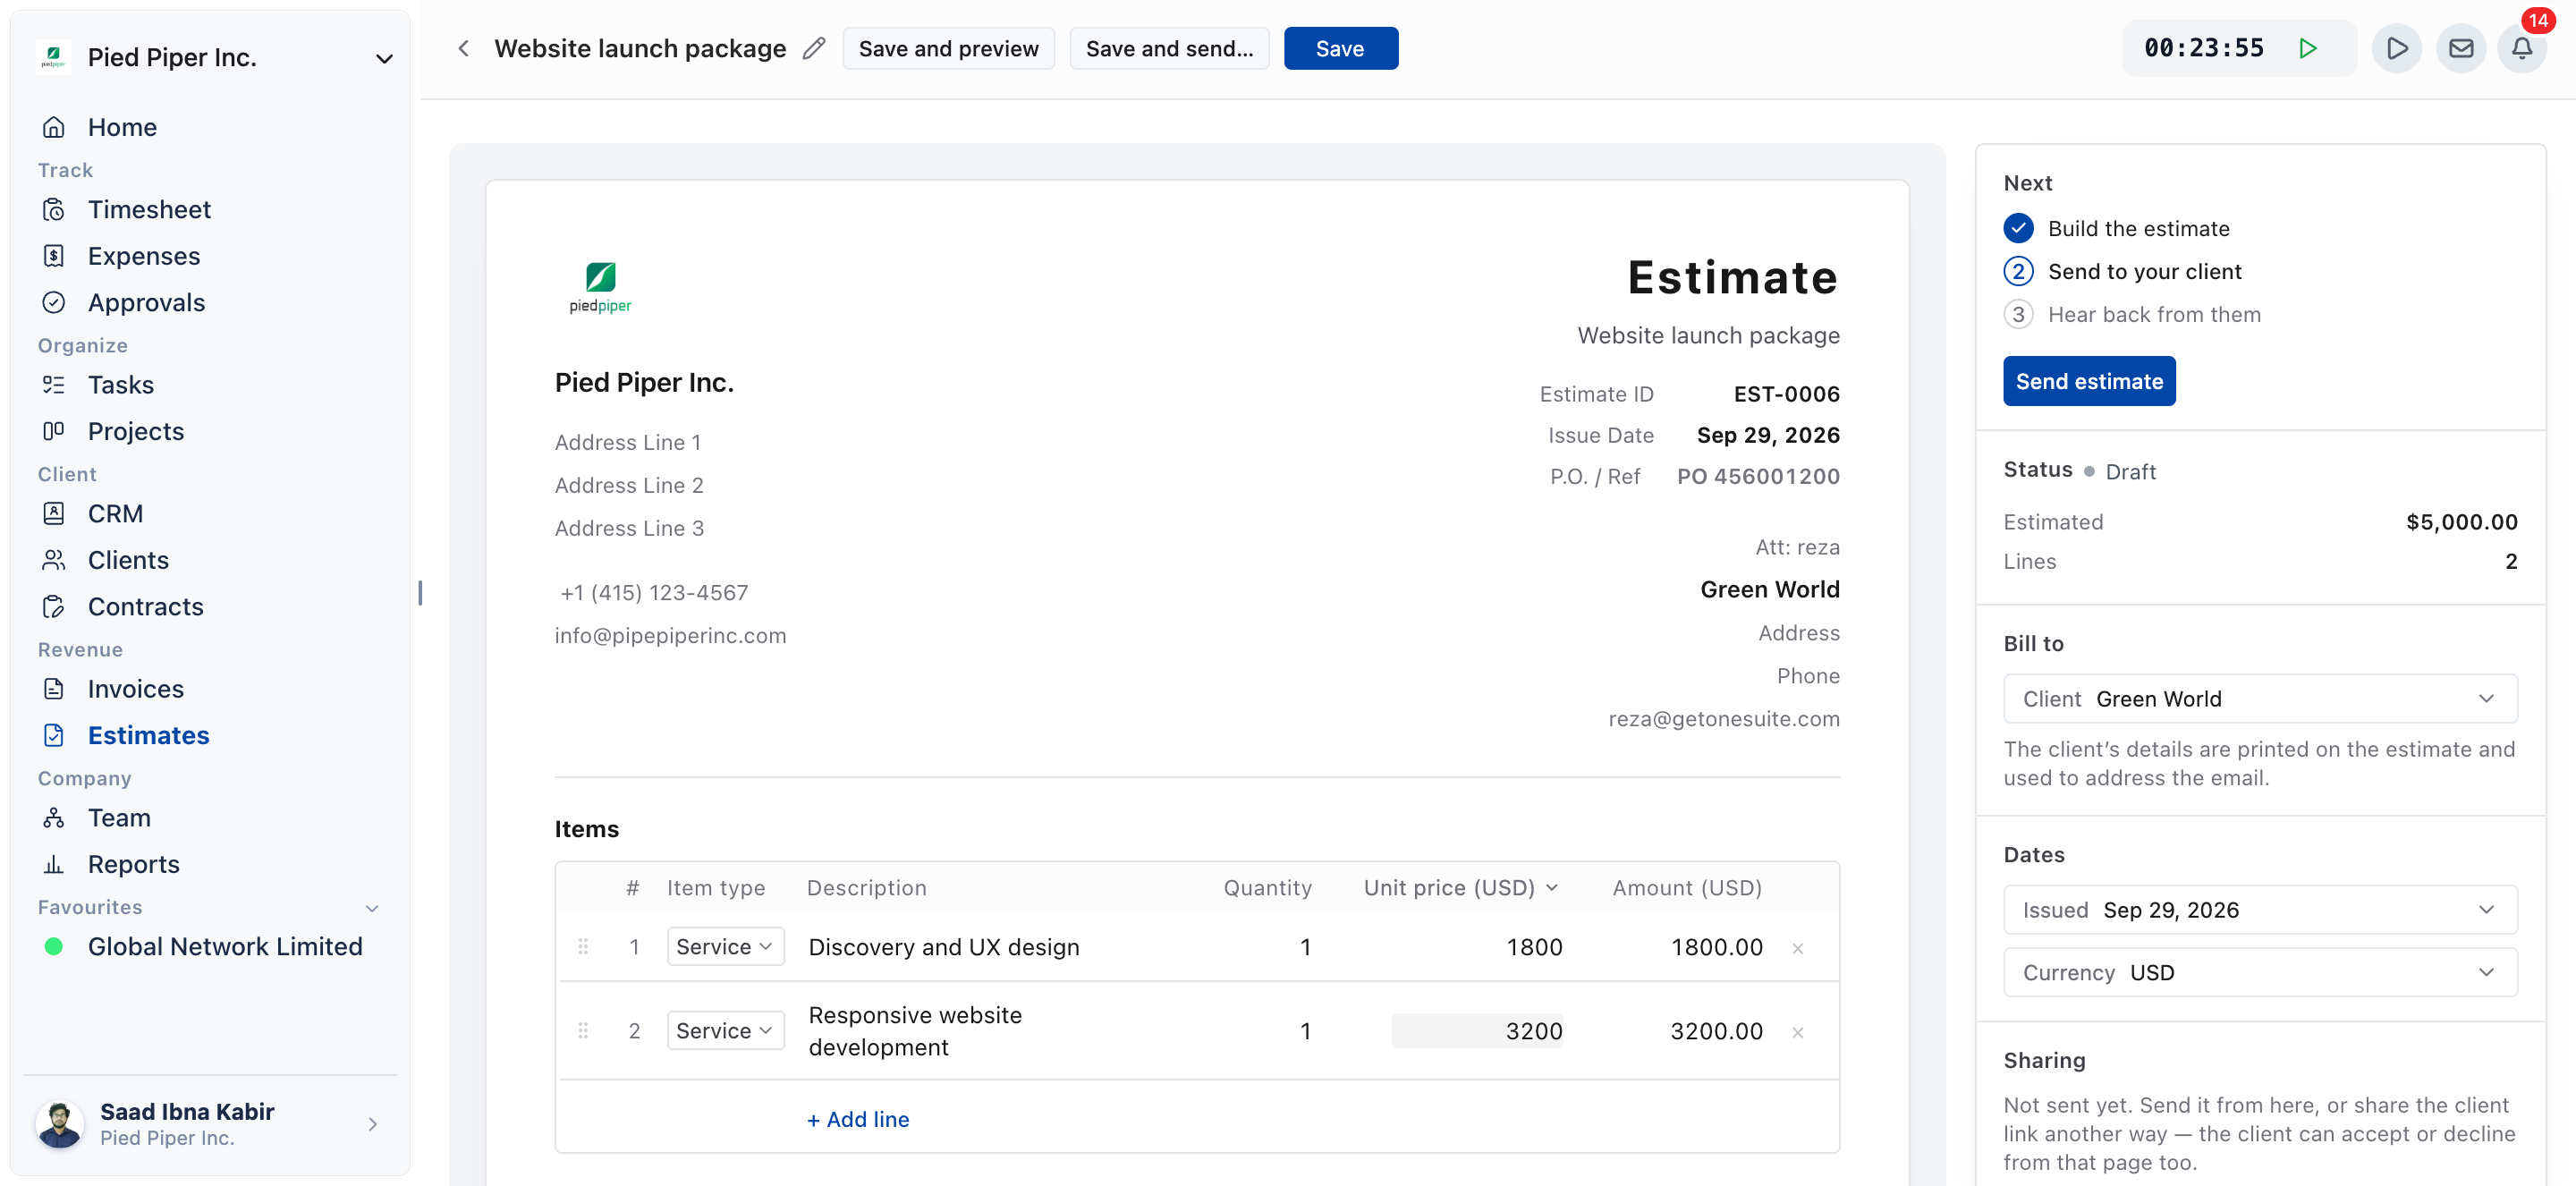
Click Estimates in the sidebar, then New estimate, and OneSuite opens a draft in the editor.
- Click Estimates in the sidebar.
- Click New estimate. A draft is created and the editor opens.
- In the side panel, under Bill to, choose the Client. Click New Client in the picker to create one on the spot. The client’s details are printed on the estimate and used to address the email.
- Check the Estimate ID on the sheet. It cannot be blank.
- Click Add a subject and describe what you are quoting.
- Under Dates, set Issued, and choose the Currency.
- Under Items, click + Add line and fill in the Description, Quantity and Unit price. Every line needs a description.
- Add any notes under the items, for example terms, validity or what happens next.
- Click Save, or Save and preview to see the estimate as your client will.
If a line has no description, OneSuite shows “Every line needs a description”. If the ID is empty, it shows “Estimate ID cannot be blank”.
How to add taxes and a discount
Taxes and the discount sit in the totals under the line items.
Taxes
- If your business has default taxes in Invoices, Configure, Taxes, click + Add followed by the tax name and rate under the items.
- To use a different rate, open the tax picker beside the tax name and pick one of your rates. If you have none, it shows No taxes set up.
- Click Apply to all to tick that tax on every line.
- With two taxes on the estimate, open Taxation mode
and choose:
- Simple: Both taxes are charged on the pre-tax amount.
- Compound: Tax 2 is charged on top of Tax.
Discount
- Type the label your client should see in the discount row, for
example
Launch discount. - Choose Percentage or Flat.
- Enter the amount. A percentage can’t go above 100, and a flat discount can’t go above the subtotal.
You can also rename the Subtotal and Total rows if your client expects different wording.
How to send an estimate
Click Save and send… in the editor, or Send estimate in the side panel, and email the estimate from the Send estimate dialog.
- Open the estimate and click Save and send….
- Under Client contacts, tick the people who should receive it.
- Add anyone else under Other recipients (or To, if the client has no contacts), plus CC or BCC if needed.
- Edit the Subject and Message. The
Merge tags you can use are
{{client.name}},{{estimate.number}},{{estimate.amount}}and{{business.name}}.[View Estimate]becomes the link to the estimate. - Tick Attach a PDF of the estimate if your client wants the file as well as the link.
- Click Send estimate.
To share the estimate without an email, click Copy client link under Sharing in the side panel. Your client can accept or decline from that page too. After sending, the side panel button reads Send again.
Estimate statuses
| Status | What it means |
|---|---|
| Draft | Created but not sent yet. |
| Sent | Sent to the client and waiting for a decision. |
| Accepted | The client accepted, or you marked it accepted. |
| Declined | The client declined, or you marked it declined. |
The estimates list has two tabs, Open and All estimates, and each row shows its status.
How your client responds
The client link opens the estimate with Accept estimate and Decline buttons, plus optional Your name and Your email fields. When the client chooses, OneSuite records the decision and tells them the sender has been notified. The link stays live afterwards and shows the decision.
You can also record the decision yourself from the Next section of the estimate’s side panel, under Hear back from them:
- Click Mark accepted if the client agreed by phone or email.
- Click Mark declined if they turned it down.
- Click Revert the decision if you recorded the wrong one.
How to turn an accepted estimate into an invoice
Once an estimate is Accepted, click Create the invoice and OneSuite creates an invoice draft from it.
- Open the accepted estimate.
- In the side panel, click Create the invoice. You can also find Create the invoice in the estimate’s row menu on the list.
- OneSuite shows “Invoice draft created” and opens the draft in the invoice editor.
- Check the draft and send it as you would any invoice.
Afterwards, the estimate shows View invoice with the invoice number, so you can click through to it. An estimate that has been turned into an invoice can’t be deleted.
Other things you can do
The row menu on the estimates list offers:
- View and Edit
- Duplicate, to quote similar work again
- Download PDF, for your own records
- Copy client link
- Create the invoice (or View the invoice once it exists)
- Delete
To export the list, click Export, then Export as CSV or Export as Excel.
Not using OneSuite yet? Start your free trial →
FAQs
What is the difference between an estimate and a proposal?
An estimate is a priced quote with line items, taxes, a total and an accept or decline decision. A proposal in Contracts is a document you write and send for signature. Use an estimate when the question is the price, and a proposal when the question is the scope and the terms.
Does accepting an estimate create the invoice automatically?
No. Accepting records the decision. You click Create the invoice when you are ready, so you decide when the client gets billed.
Can my client accept an estimate without logging in?
Yes. The client link opens the estimate and carries the Accept estimate and Decline buttons. Your client’s name and email are optional.
Can I change an estimate after sending it?
Yes, while it is still waiting for a decision. Edit it, then click Send again. Once it is accepted or declined, click Revert the decision before you edit it.
Can I just send an invoice instead of an estimate?
You can, but an invoice asks for payment. If the client has not agreed the price yet, an estimate puts their decision on record before any money is due.
Why can’t I save my estimate?
Check two things: the Estimate ID cannot be blank, and every line needs a description. OneSuite tells you which one is missing.
What to do next
Send the invoice: Walk through your first send with Sending Your First Invoice.
Set up your taxes: Add the rates your estimates and invoices use with How to Set Taxes on Your Invoices.
Get paid: When the client pays the invoice, follow How to Record Invoice Payments.