
Skip to content
OneSuite Logo
  • SolutionsExpand
    • Client Portal

      Ensure transparency & gain trust

      Invoice

      Create invoices in minutes & get paid

      Project Management

      Manage tasks smartly & deliver timely

      CRM

      Nurture leads and win more clients

      Document & E-Signature

      Create & sign documents easily

      Team & Collaborators

      Work together, stay aligned

      Email Inbox

      Manage client emails in one place

      Time Tracking

      Track hours and boost productivity

      Productized Service

      Package and sell services easily

  • Use CasesExpand
    • Marketing Agency

      Manage campaigns, clients, and billing in one place so you can focus on delivering results.

      SEO Agency

      Track projects, share reports, and invoice clients without juggling five different tools.

      Video Editing

      Streamline approvals, revisions, and payments so you spend more time in the timeline.

      Local SEO

      Organize multi-location clients, automate invoicing, and keep every project on track.

      Photography

      From booking to final delivery, manage your entire client workflow in a single dashboard.

      Event Management

      Coordinate timelines, vendors, and client communications without anything slipping through the cracks.

      Creative Agency

      One workspace for briefs, feedback, and billing so your creative energy stays on the work.

      Consulting

      Proposals, project tracking, and invoicing unified so you look as professional as your advice.

      IT Services

      Manage tickets, retainers, and client portals without duct-taping a dozen SaaS tools together.

  • ResourcesExpand
    • Documentation

      Read guides and help docs

      Affiliate

      Partner and earn together

      Integrations

      Connect tools effortlessly

      Roadmap

      See what’s coming next

      Changelog

      Stay updated with the latest

      Support

      Get help whenever you need it

      Compare

      See how OneSuite stacks up

      Case Study

      Real results, real teams

      FAQ

      Find answers to common questions

  • Pricing
  • For Agency

Start free trial

Help Center

  • Documentation
  • Public Roadmap
  • Book a demo
  • Get Support
OneSuite Logo
intro to onesuite

OneSuite 101

6
  • Introduction
  • Understanding OneSuite’s Structure
  • How Solutions Work Together
  • Navigating OneSuite
  • All OneSuite Capabilities
  • OneSuite Glossary
quick start guide

Quick Start Guide

7
  • Setting Up Your Business
  • Adding Your Payment Methods
  • Inviting Team Members
  • Adding Your First Leads
  • Adding Your First Client
  • Giving Your Client Portal Access
  • Sending Your First Proposal

CRM

7
  • Customizing Your Opportunities View
  • CRM Overview
  • Adding People
  • Adding Companies
  • Creating Opportunity
  • How Opportunities, Companies, and People Work Together
  • Understanding Pipeline Stages
client

Client Management in OneSuite

7
  • Adding Clients
  • Client Profiles
  • Client Portal Customizationย 
  • Understanding the Clients Solution
  • Imports, Exports, and Search
  • The OneSuite Client Portal
  • Video Documentation : Client Management
pm

Manage your Projects Effortlessly

7
  • Subtask Behavior & Movement Management
  • Laying the Groundwork: Project Creation in OneSuite
  • Managing Project Boards in OneSuite
  • Adding Tasks to Boards in OneSuite
  • Lifesaver:Templates in OneSuite
  • Custom Categories, Tags, and Labels in Projects
  • Video Documentation : Project Management

Documents

5
  • Overview
  • Creating a Document from Scratch
  • Uploading a PDF Document
  • Sending Documents to Parties to Sign
  • Signing a Document
team

OneSuite's Team Management

4
  • Inviting Collaborators in OneSuite
  • Creating Personalized Departments in OneSuite
  • Managing Team Members in OneSuite
  • Video Documentation : Team Collaboration
Invoices & Payments

Invoices & Payments

7
  • Access & Navigation
  • Invoice Settings & Customization
  • Create One-time Invoices
  • Creating Recurring Invoices
  • How to set taxes on your invoices
  • How to Add Direct Bank Transfer Instructions to Your Invoices
  • How to Customize Invoice Email Messages

Time Tracking & Timesheets

4
  • Invoice Generation from Billable Hours
  • Timesheet Management & Approval
  • Time Tracking in OneSuite
  • Time Tracking & Timesheetsย 

Email Inbox in OneSuite

5
  • Gmail and Outlook integration
  • How to Integrate Microsoft Outlook in OneSuiteย 
  • How to Use Email Templates in OneSuiteย 
  • How to Integrate Gmail in OneSuiteย 
  • How to Send and Receive Email in OneSuiteย 

Calendar View

1
  • Calendar View

Dashboard

7
  • Overviewย 
  • How to Customize Your Dashboard
  • Client Portal Dashboardย 
  • Monitor Documents, Contracts & Marketing Lead Sources
  • CRM, Client & Pipeline Widgets โ€” OneSuite Dashboard Guide
  • Track Tasks, Deadlines & Project Activity in OneSuite
  • Track Revenue Trends, Forecasts & Top Projects in OneSuite
View Categories
  • Home
  • Docs
  • Invoices & Payments
  • Create One-time Invoices

Create One-time Invoices

Get paid faster with professional invoices that take just minutes to create. Whether you’re billing a new client or wrapping up a project, you’ll have a polished, payment-ready invoice in no time.

Before You Start

Make sure you have:

  • Client information added to OneSuite
  • Work completed and ready to bill
  • Your business information set up in Invoice Settings

Step 1: Start Your Invoice #

1. Navigate to Invoices in your left sidebar
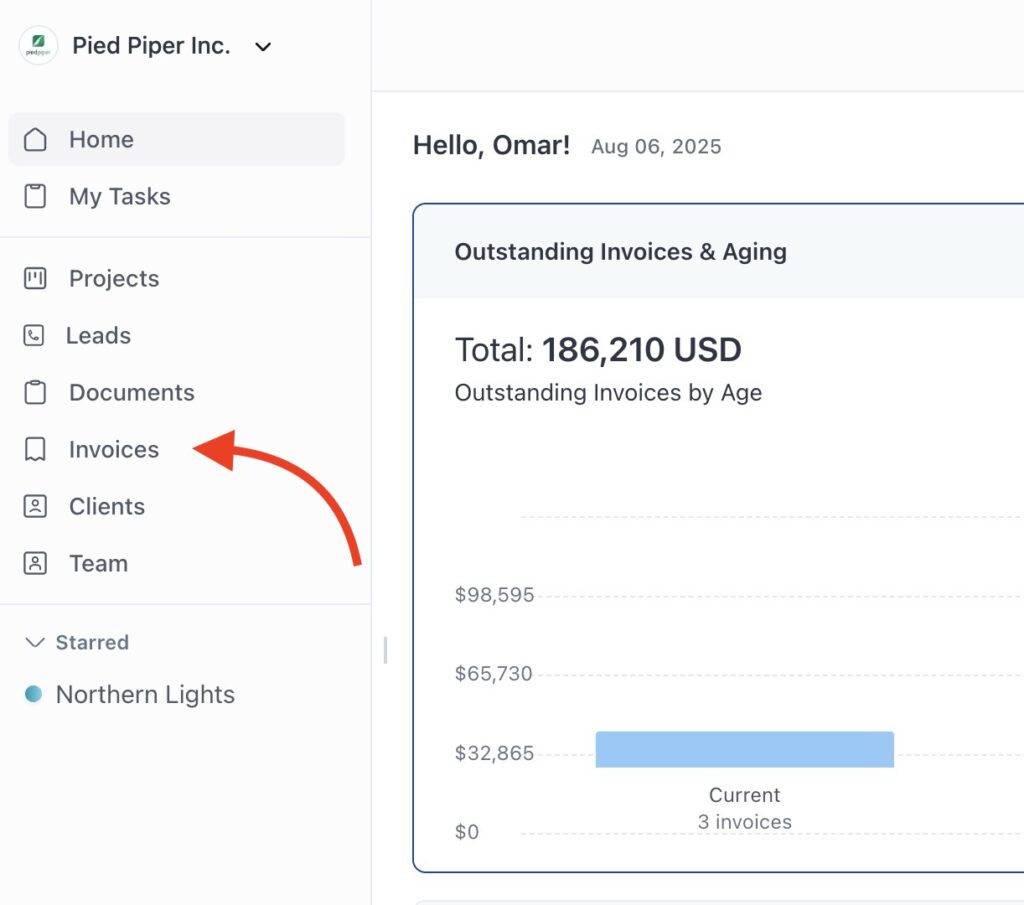
Navigate to Invoices in your left sidebar

2. Click the Create New button in the top-right corner
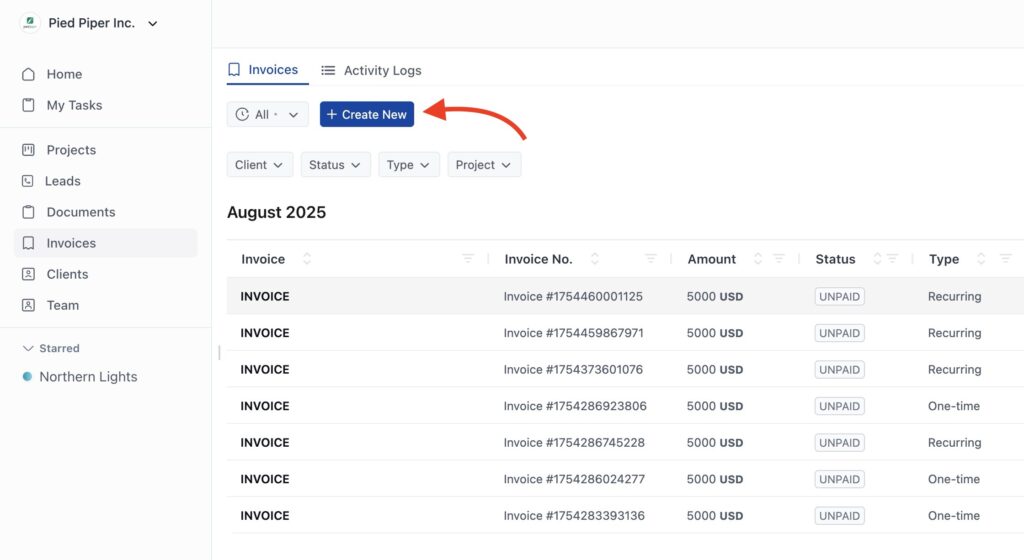
Click the Create New button in the top-right corner

You’ll see the invoice creation page with two options:
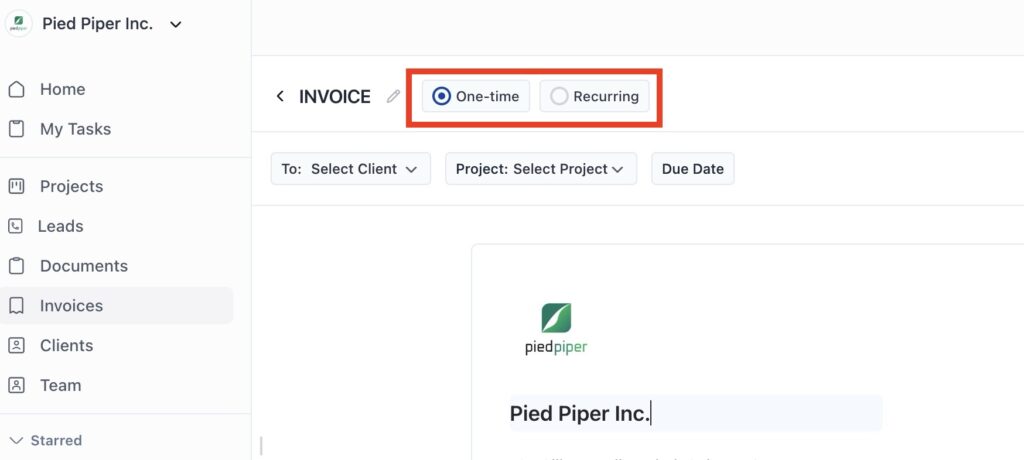
You'll see the invoice creation page with two options:
  • One-time (selected by default) – For single billing
  • Recurring – For ongoing services (Learn about recurring invoices โ†’)

Keep One-time selected if you want to create ontime invoices.

Step 2: Set Invoice Basics #

Choose Your Client and Project #

In the top section, you’ll see three dropdown fields:
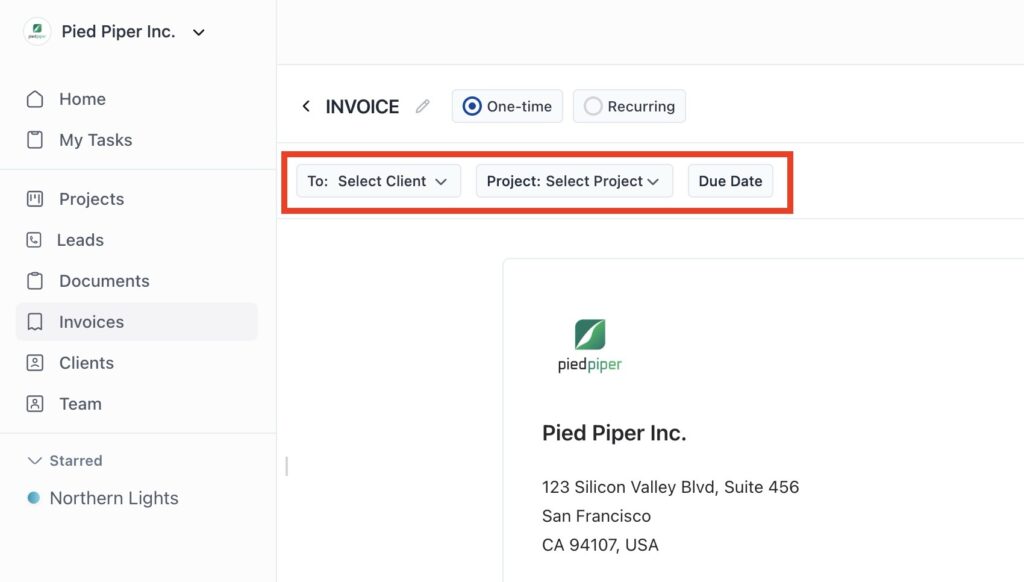
Choose Your Client and Project

To: Select Client

  • Click to choose an existing client. Use search feature for flexibility.
  • Or select “Add New Client” if the client is not in the list.

Project: Select Project

  • Link this invoice to a specific project (optional). Search and select the project from the dropdown.
  • If the project is not found in the dropdown, add it from projects.
  • Helps with organization and reporting
  • Leave blank if not project-related

Due Date

  • Click to open the date picker
  • Choose from three options:
    • Upon Receipt – Payment due immediately
    • After [X] days of issue date – Standard net terms (15, 30, 60 days)
    • Custom – Pick any specific date

๐Ÿ’ก Common due date terms:

  • Net 15: Payment due within 15 days
  • Net 30: Payment due within 30 days
  • Upon Receipt: Payment due immediately

Step 3: Review Your Business & Invoice Information #

Your invoice header shows your company details and invoice information automatically:
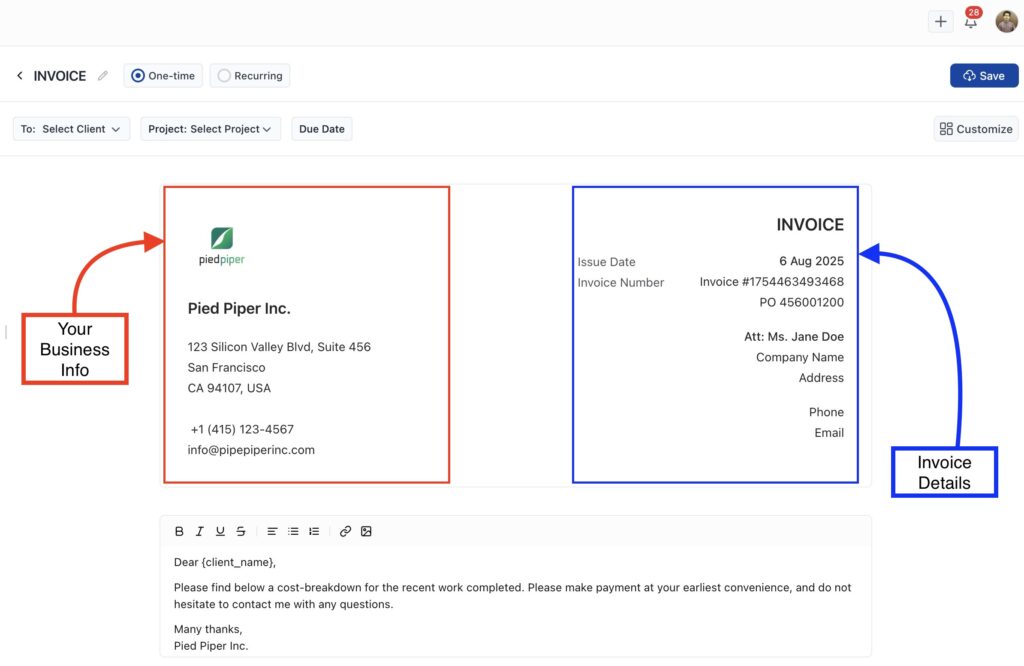
Review Your Business Information

Left side (Your Business):

  • Company logo (click to change)
  • Business name and address
  • Phone number (click to edit)
  • Email address (click to edit)

Right side (Invoice Details):

  • Issue date (today’s date, click to change)
  • Invoice number (auto-generated, click to customize)

โš ๏ธ Important: Your logo and contact details come from your global invoice settings. Changes here affect this invoice only.

Step 4: Add Client Information #

The client information is automatically pulled from your saved client data. If you need to make changes, just click on any field and update it.
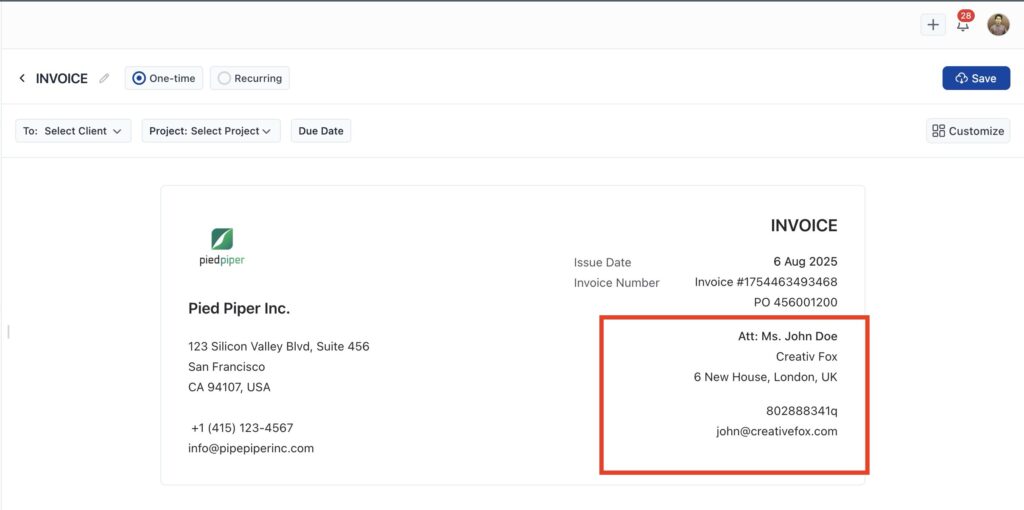
Client Information
  • Att: Client contact name (editable)
  • Company Name (if applicable)
  • Address and Email (both editable)

Click on any field to edit the information for this specific invoice.

Step 5: Customize Your Message #

Below the client information, you’ll see a greeting message:

Dear [client_name],

Please find below a cost-breakdown for the recent work completed. 
Please make payment at your earliest convenience, and do not 
hesitate to contact me with any questions.

Many thanks,
[Your Business Name]

To customize the message:

  • Click anywhere in the text area
  • Edit the greeting to match your tone
  • The text editor toolbar lets you format text (bold, italic, lists, links).

๐Ÿ’ก Tip: This greeting comes from your global invoice settings, but you can personalize it for each client.

Step 6: Add What You’re Billing For #

This is where you list the work youโ€™ve done or products youโ€™ve sold. Each row in the items table should describe something you’re charging for.
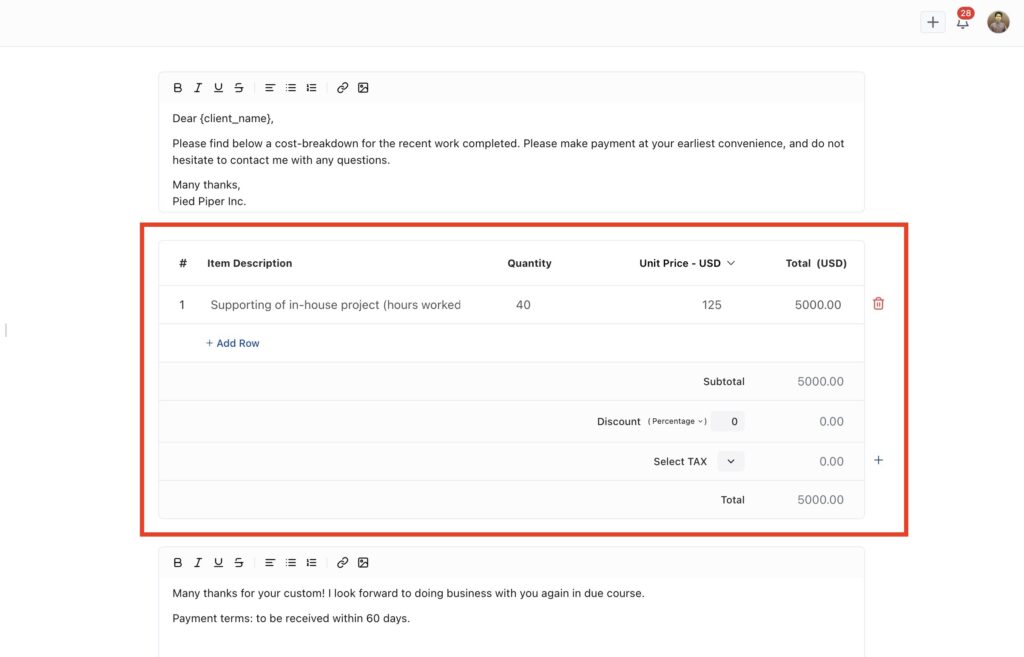
Add What You're Billing For

For Each Line Item: #

Item Description

  • Describe the work completed or product sold
  • Be specific: “Website design consultation” vs. “Consulting”
  • Include dates or project phases if helpful

Example:
โœ… “Website design โ€“ homepage & contact page”
โŒ “Design”

Quantity

  • Enter how many hours, items, or units youโ€™re billing.
  • Supports decimals (e.g., 2.5 hours)

Unit Price

  • How much you charge per hour, item, or unit.
  • Your currency is set to USD by default, but you can switch it from the dropdown if needed.
  • The dropdown shows other available currencies

Total

  • Automatically calculated (Quantity ร— Unit Price)

To Add More Items: #

Click + Add Row below the table to add additional line items.

Step 7: Review Totals and Apply Discounts or Tax #
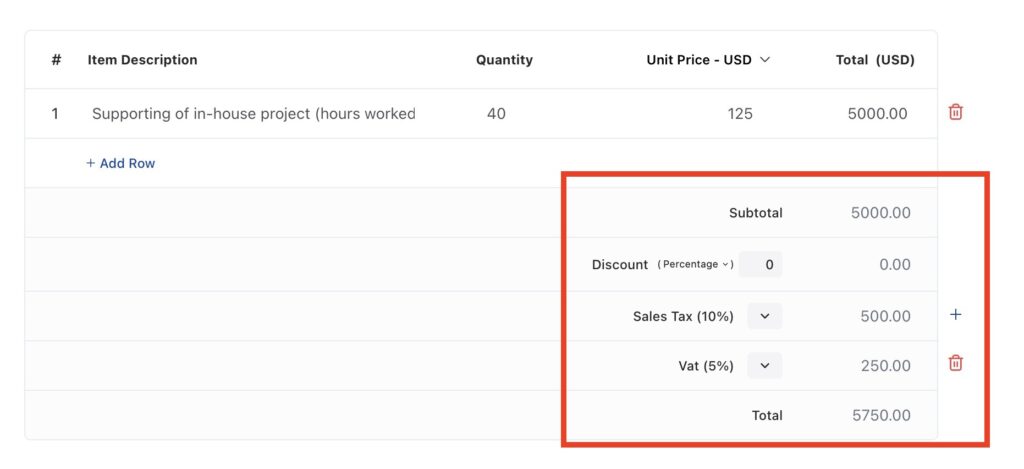
Invoice total

Review the Subtotal #

This is the sum of all the line items youโ€™ve added above. No action needed here unless youโ€™re editing item rows.

Add Discount #

You can apply a discount if needed โ€” either as a flat amount or a percentage.

Examples:

  • Flat: $50 off
  • Percentage: 10% off

Just choose the type and enter the amount. The total will update automatically.

Add Tax #

If taxes apply, select the appropriate tax from the dropdown.
These tax names and rates come from your global tax settings, so make sure theyโ€™re set up beforehand.

Example:

  • VAT 15%
  • Sales Tax 7%

You can apply multiple taxes if needed. To add multiple taxes, click the plus (+) button on the right.

Payment Terms #

At the bottom, you’ll see terms like:

Many thanks for your custom! I look forward to doing business 
with you again in due course.

Payment terms: to be received within 60 days.

These come from your global terms settings but can be edited for this specific invoice.

Step 8: Configure Invoice Options #

Click the Customize button on the right to open advanced options:

Setup Options (Toggle On/Off): #

  • Apply TAX: Include tax calculations
  • Greetings message: Show/hide the client greeting
  • Terms: Include payment terms
  • Payment methods: Show accepted payment options

Online Payment Methods: #

Enable clients to pay online directly from the invoice:

  • Stripe – Credit/debit cards
  • PayPal – PayPal account or cards
  • QuickPay – Various payment options
  • Razorpay – Multiple payment methods

๐Ÿ’ก Tip: Online payments get you paid faster! Set up your preferred payment methods in Payment Settings.

Step 9: Save Your Invoice #

  1. Click the Save button in the top-right corner
  2. Your invoice is now saved as a draft
  3. You’ll see a confirmation message
  4. A Share option will appear next to the Save button

What Happens Next? #

After saving, you can:

๐Ÿ“ค Send Your Invoice

  • Click Share to email it to your client
  • Learn how to send and track invoices โ†’

๐Ÿ“„ Download PDF

  • Get a PDF copy for your records
  • Attach to your own emails if preferred

โœ๏ธ Make Changes

  • Edit the invoice anytime before sending
  • Changes are saved automatically

Updated on August 20, 2025

Did this article answer your question?

  • Happy
  • Sad
Invoice Settings & CustomizationCreating Recurring Invoices

Leave a Reply Cancel reply

Your email address will not be published. Required fields are marked *

This site uses Akismet to reduce spam. Learn how your comment data is processed.

Table of Contents
  • Step 1: Start Your Invoice
  • Step 2: Set Invoice Basics
    • Choose Your Client and Project
  • Step 3: Review Your Business & Invoice Information
  • Step 4: Add Client Information
  • Step 5: Customize Your Message
  • Step 6: Add What You're Billing For
    • For Each Line Item:
    • To Add More Items:
  • Step 7: Review Totals and Apply Discounts or Tax
    • Review the Subtotal
    • Add Discount
    • Add Tax
    • Payment Terms
  • Step 8: Configure Invoice Options
    • Setup Options (Toggle On/Off):
    • Online Payment Methods:
  • Step 9: Save Your Invoice
  • What Happens Next?
OneSuite Logo

Streamline your agency's workflow while you focus on growthโ€”manage clients, projects, teams, proposals, contracts, and invoices effortlessly with OneSuite!

product hunt

Follow Us On

  • Facebook
  • X
  • Instagram
  • LinkedIn

Join Our Community

  • Facebook
  • WhatsApp

Features

Projects

Lead Pipeline

Documents

Invoices

Client Portal

Teams

Resources

Contact

Support

Docs

Blog

Branding

Become an affiliate

Agency Partner Program

Public roadmap

Book a demo

Compare

OneSuite vs. Kitchen Co

OneSuite vs. Moxie

OneSuite vs. Flowlu

OneSuite vs. Plutio

OneSuite vs. Bonsai

OneSuite vs. ClientManager

  • Terms of use
  • Privacy policy
  • Cookie policy
  • Refund policy
  • Acceptable use policy
  • Data processing terms
  • Solutions
    • Client Portal

      Ensure transparency & gain trust

      Invoice

      Create invoices in minutes & get paid

      Project Management

      Manage tasks smartly & deliver timely

      CRM

      Nurture leads and win more clients

      Document & E-Signature

      Create & sign documents easily

      Team & Collaborators

      Work together, stay aligned

      Email Inbox

      Manage client emails in one place

      Time Tracking

      Track hours and boost productivity

      Productized Service

      Package and sell services easily

  • Use Cases
    • Marketing Agency

      Manage campaigns, clients, and billing in one place so you can focus on delivering results.

      SEO Agency

      Track projects, share reports, and invoice clients without juggling five different tools.

      Video Editing

      Streamline approvals, revisions, and payments so you spend more time in the timeline.

      Local SEO

      Organize multi-location clients, automate invoicing, and keep every project on track.

      Photography

      From booking to final delivery, manage your entire client workflow in a single dashboard.

      Event Management

      Coordinate timelines, vendors, and client communications without anything slipping through the cracks.

      Creative Agency

      One workspace for briefs, feedback, and billing so your creative energy stays on the work.

      Consulting

      Proposals, project tracking, and invoicing unified so you look as professional as your advice.

      IT Services

      Manage tickets, retainers, and client portals without duct-taping a dozen SaaS tools together.

  • Resources
    • Documentation

      Read guides and help docs

      Affiliate

      Partner and earn together

      Integrations

      Connect tools effortlessly

      Roadmap

      See what’s coming next

      Changelog

      Stay updated with the latest

      Support

      Get help whenever you need it

      Compare

      See how OneSuite stacks up

      Case Study

      Real results, real teams

      FAQ

      Find answers to common questions

  • Pricing
  • For Agency
  • Documentation
  • Public Roadmap
  • Book a demo
  • Get Support