This article walks you through creating your OneSuite account and completing the initial setup. You’ll configure your business information, choose modules, and customize settings to match your workflow.
Create Your Account #
- Go to onesuite.io
- Click the ” Try for free button in the top right corner. This will direct you to the sign-up page.
- Enter your email address
- Create a strong password
- Click Create Account
You’ll receive a verification email. Click the link to verify your account.
Complete the Onboarding Process #
OneSuite guides you through six setup pages. You can configure everything now or skip and set up later. All settings can be changed anytime in Settings (in General & Cutomize Module)
Page 1: Add Your Business #
Enter your business information:
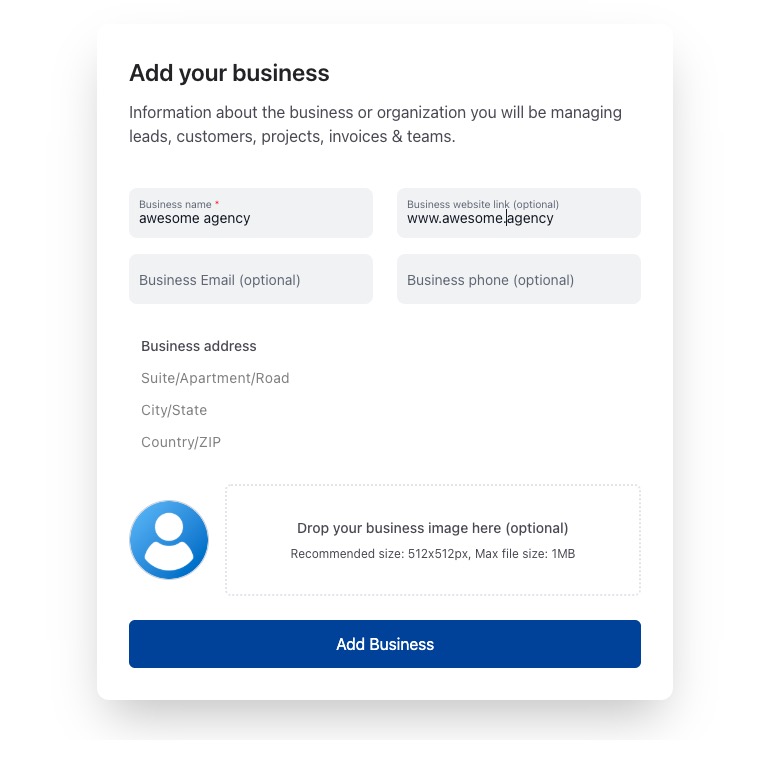
Required:
- Business name (usually your company name)
Optional:
- Business website link
- Business email
- Business phone
- Business address (Suite/Apartment/Road, City/State, Country/ZIP)
- Business logo (512x512px, max 1MB)
Click Add Business to continue.
Why this matters: Your business name and logo appear on invoices, proposals, and the client portal.
Page 2: Customize Modules #
Choose which modules to enable. All are turned on by default.
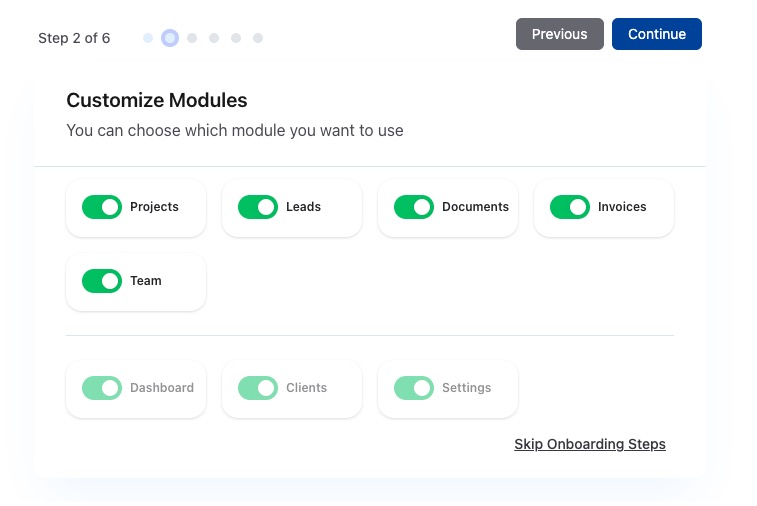
Core modules:
- Projects – Manage client work and tasks
- Leads – Track opportunities in your CRM
- Documents – Create proposals and contracts
- Invoices – Bill clients and accept payments
- Team – Manage team members
Additional modules:
- Dashboard – View metrics and analytics
- Clients – Store client information
- Settings – Configure your business
Toggle off any modules you don’t need right now. You can enable them later.
Click Continue or Skip Onboarding Steps.
Tip: If you’re unsure, leave all modules enabled. You can always disable them later.
Page 3: Departments #
Add departments to organize your team. Common departments include:
- Engineering
- Design
- Digital Marketing
- HR
- Finance
- Sales
- Admin
To add a department:
- Click Add department
- Enter the department name
- Choose a color (optional)
Click Continue or Skip Onboarding Steps.
Skip this if: You have a small team or don’t need department organization yet.
Page 4: Leads Setup #
Customize how you track leads in your CRM.
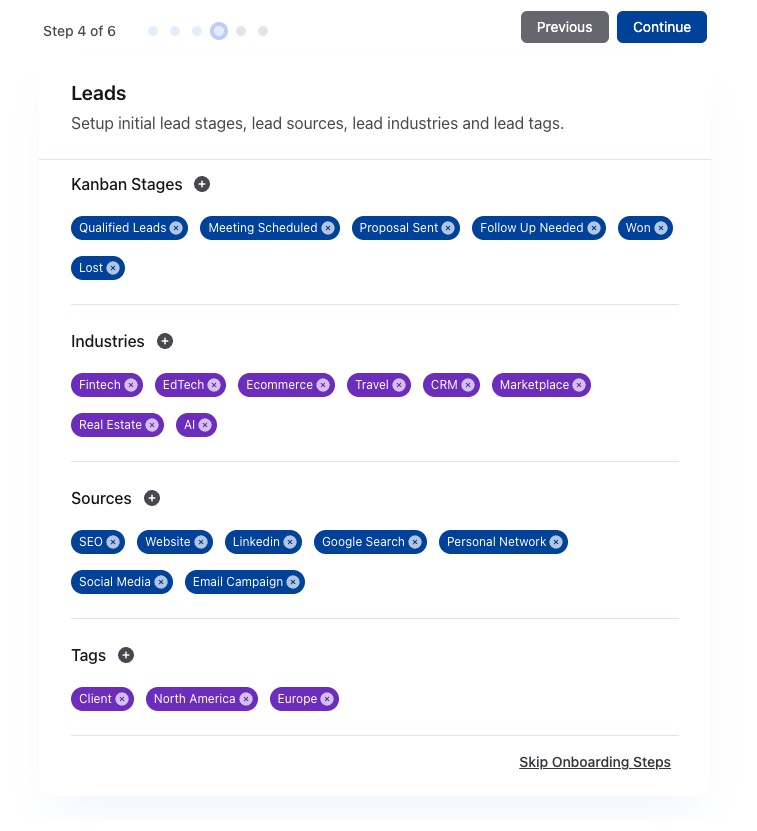
Kanban Stages
These are the stages leads move through in your sales pipeline. Default stages:
- Qualified Leads
- Meeting Scheduled
- Proposal Sent
- Follow Up Needed
- Won
- Lost
To customize:
- Click the × on stages you don’t need
- Click + to add new stages
- Drag stages to reorder them
Industries
Select industries you work with. This helps you categorize leads. Examples:
- Fintech
- EdTech
- Ecommerce
- Travel
- CRM
- Marketplace
- Real Estate
- AI
Click + to add custom industries.
Sources
Choose where your leads come from:
- SEO
- Website
- Google Search
- Personal Network
- Social Media
- Email Campaign
Click + to add custom sources.
Tags
Add tags to organize leads. Examples:
- Client
- North America
- Europe
Tags help you filter and segment leads later.
Click Continue or Skip Onboarding Steps.
Page 5: Project Settings #
Configure how you organize projects.

Project Categories
Choose project types:
- In-House Project (internal work)
- Client Project (client work)
Click + to add custom categories.
Tags
Add project tags for organization:
- SaaS
- UX Design
- Website Design
- Website Redesign
- Web App
- Mobile App
- SEO
Click + to add custom tags.
Click Continue or Skip Onboarding Steps.
Page 6: Document Settings #
Choose document types you’ll use:
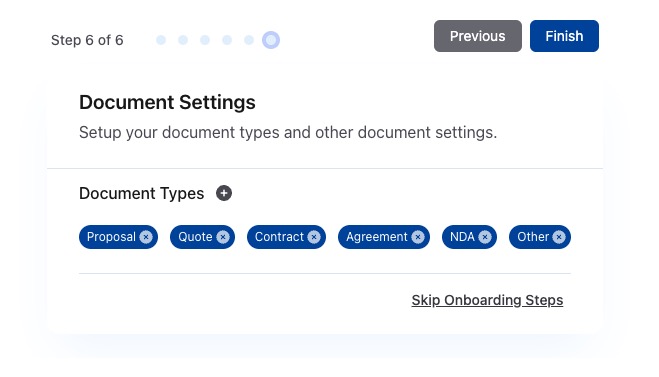
- Proposal
- Quote
- Contract
- Agreement
- NDA
- Other
Select all that apply. You can add custom document types later.
Click Finish to complete onboarding.
Skipping Onboarding #
If you choose Skip Onboarding Steps at any point, you’ll see a confirmation dialog with two options:
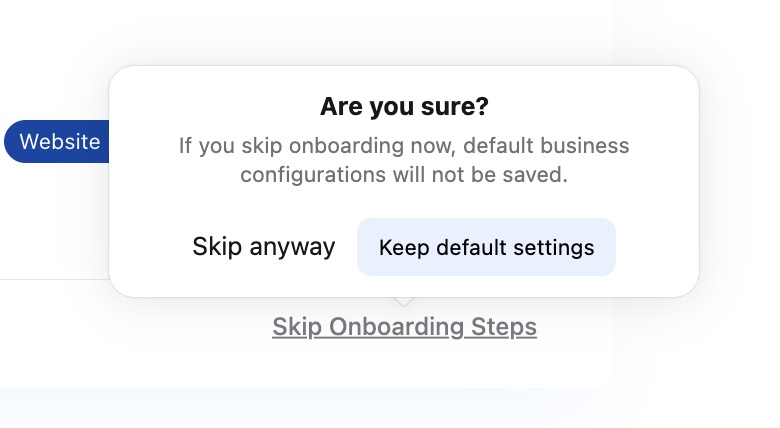
- Skip anyway – Jump to your workspace without saving current configurations
- Keep default settings – Save what you’ve entered so far and proceed to your workspace
Don’t worry if you skip. You can complete setup anytime in Settings → Business Settings.